
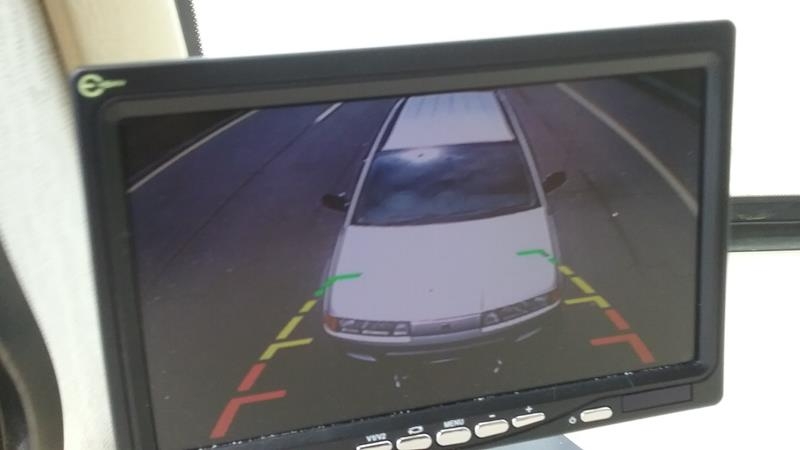
I replaced the original black and white Panasonic camera and monitor with a color camera and 7 inch color monitor. I also installed a 6 LED work-light on the rear cap that I use to illuminate the back end of the Southwind. Great for backing up in the dark, hooking up the toad, etc.
 INSTALLING THE CAMERA
I decided to mount the new camera, inside of the original camera cover.
I removed the original camera cover and cleaned it up.
I then cut a piece of clear plastic that fit inside the cover, I used stainless bolts and nylon self locking nuts to hold the clear plexiglass to the inside of the cover.
I wanted the camera to be centered in the old opening. I used 2 inch long #10 bolts and a lot of washers (like maybe 20 washers) to space the camera so it somewhat centered in the window. The number of washers I used was to space the camera so the lens was almost touching the window. The spacers also clamped the camera and hold it in place. Center and position the camera, then snug up the mount bolts.
POWER TO THE CAMERA
The original camera got its 12 volt power from the monitor. The camera video cable served double purpose, It supplied 12 volts from the monitor to the camera, and camera video from the camera back to the monitor. There was no separate power cable to the camera, so I needed a way to get 12 volts to the camera.
In reality, I needed 3 cables, 1: power to the camera, 2: power to the work-light, and 3: video from the camera. These cables would run from the top of the rear cap to the drivers instrument panel.
I bought a 50 ft video cable, (5 cables in one) and use this for camera power and video, and LED work-light power. Run the cable under the Southwind and secure it with wire-ties. The cable can be fished up to the camera by dropping a string from the camera opening and pulling the cable up between the rear cap and the rear wall. On the front, the cable can be fished through an existing firewall hole located beside the brake cylinder.
Rather than cut the RCA connectors off the new cable, I found a couple old RCA female cables and cut the connectors off of these, wiring them for the camera and work-light power on both ends of the 50 ft cable. I then plugged these into the 50 ft cable, wrapping the connections with black electrical tape to help weatherproof then and also keep them from coming apart. Keep track of what RCA connectors on the end of the cable color does what:
RED – Camera power
WHITE – Camera Video
BLACK – LED Work-light power
The BLUE and YELLOW aren’t used, so I have two spares that run from the instrument panel to the rear cap.
NOTE – The 50 ft video cable isn’t designed to carry power. I checked the LED work-light, it was only drawing 0.8 amps. Th 50 ft video cable should be able to handle this with no problems.
POWER SWITCHES
I wanted to install switches for both the camera and the rear work light. I tried to locate switches that matched the original Southwind switches, but no luck. I removed the switch panel and cut new holes in it for the new style switches.
POWER – I used “Mirror Power” circuit to feed the camera, as its wired and feed through the ignition ACC switch. I tapped power from the “Hood Light” to use for the Work-light. This circuit is hot all the time make sure to wire the switch’s internal light so you can tell if the switch is turned on. The work-lite switch is wired so the switch light lights when its turned on.
I bought the camera, monitor, cable, and LED work-light from Amazon Below are the links.
FOLLOWUP
After a year of operating, one of the things I noticed is dust and dirt was accumulating on the inside of the clear window. I stuffed foam inside the housing to surround the camera to kind of seal the camera and window against dust and dirt.
Excellent web site. Maybe you can help.B can you helpy the way beautiful paint job bet it cost a few shekles .I have a 2006 southwind 32v.My backup monitor is in the dash and I want to upgrade to a colour unit.Cant seem to get any satisfaction from Fleetwood.They say i would probably have to remove dash. I cant seperate the upper dash from the instrument panel.Can you help in any it would certainly help
I just pulled mine out of a 2007 32V. You have to take the instrument/speed odometer panel off to get to it. It has these rubber pieces on the side and bottom that you need to pull off. Then use a a flat tool (I used a thin metal spackling scraper) for the right side because you can’t get to it. Then you just pull as hard as you can until it comes out. It’s not bolted in. The rubber rings and plugs on the bottom are what is holding it in. It was a real mother “******” to get out. I almost gave up.
Sorry, I’m not familiar with how they mounted the camera and monitor in the later models. My instrument panel hinges up and forward to gain access to the actual instrument cluster and other stuff thats mounted on the dash..