
UPDATE (Jan 20, 2023) : I’m working on an optional control module so I can control the heat pumps reversing valve with my Waiter ECC system. I have a prototype version installed and using it to develop the software. If there’s enough interest, I may offer this option to the public.
My front A/C unit was weak and probably needed a top off of refrigerant. When it was running, it would only draw 8 amps. I replaced the caps on it a couple years ago as a preventative measure. Its the original unit that the motorhome came with. I believe it was either an 11k or a 13k btu unit. Its 23 years old, so maybe its time for a replacement.
I decided on a 15k btu unit, the MACH 15k with heat pump (model 48004-666). Although I can’t used the heat pump at this time, I’m working on a project for the Waiter ECC that will control the heat pump. More on that later..
I took a lot of photos during the disassembly process so I’d know where everything goes. Unfortunately, my photographer who was supposed to get photos of the units going up on the roof got caught up in the action and forgot to take photos. so we only got a couple, but you’ll get the idea.
Getting ready.
Remove all power from the motorhome, This includes 12 volts and 110 volts. I don’t want 12 volts going to the relay box, or any surprises with 110 volts on any of the relay box circuits.
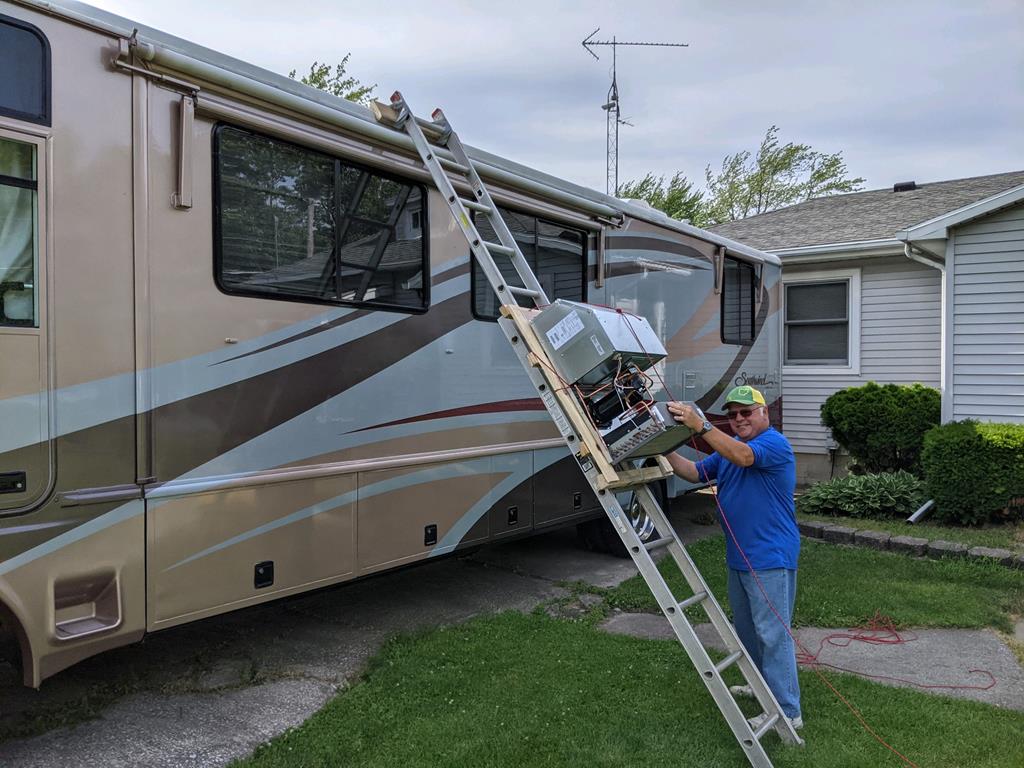 Getting the units on and off the roof went a lot easier than I had expected. Before putting the extension ladders to the roof, I duct taped a 2×6 to the top of the ladder and wrapped it in towels. This helped distribute the loads and keeps from damaging the roof. I then propped an extension ladder against the roof. I placed a couple small pieces of plywood on the roof to set the A/C units on, this prevents sharp edges from punching holes in the roof.
Remove old unit
I removed and saved the old front cover. Its the same as my back A/C unit cover. A heavy duty shatterproof.
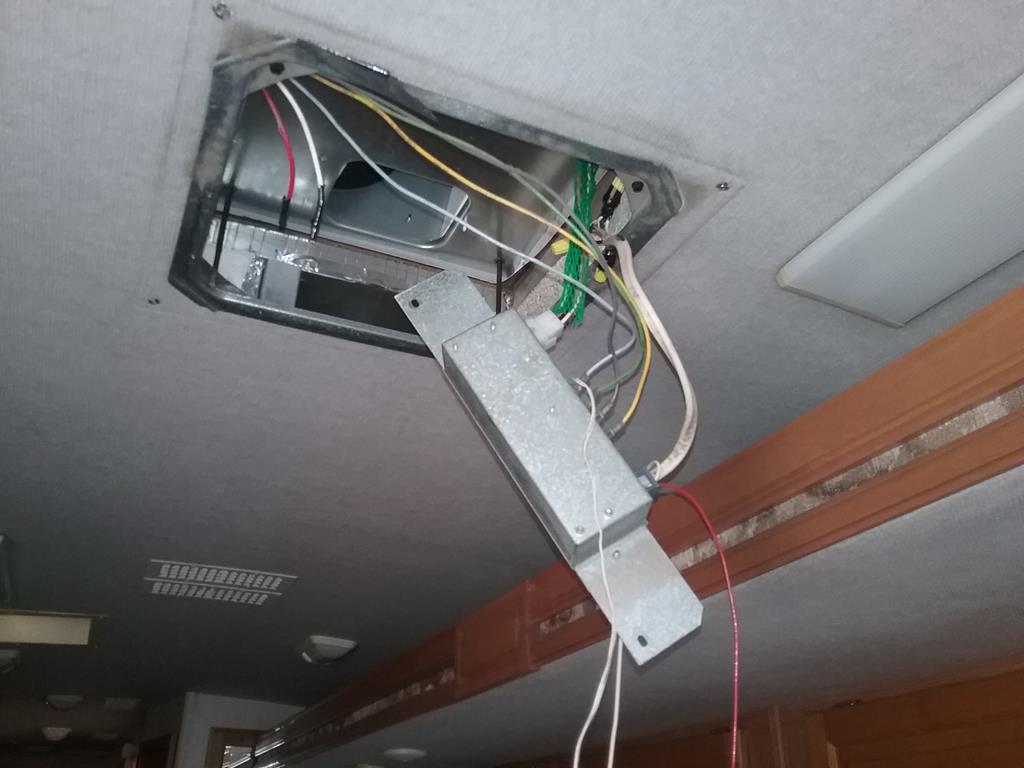
From inside the motorhome, remove the ceiling intake cover. Remove the exhaust cover panel and the short section of duct. There is a large plate that secures the A/C unit to the roof. This is held on by four long bolts, one in each corner of the plate. Remove these bolts and remove the plate.
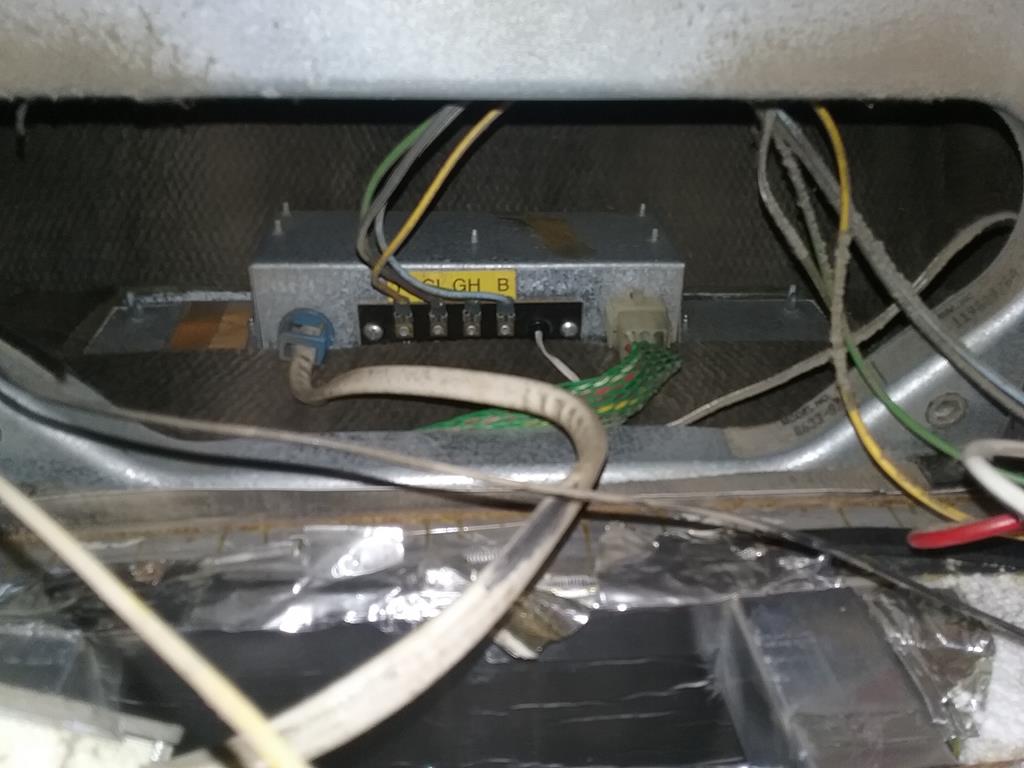 You can now see up inside the intake area. Look carefully and you’ll see a relay box mounted to the inside wall of the A/C unit with two (wing) nuts (10×24). Before removing the relay box, remove the freeze sensor from the evaporator coil. This is the small white wire coming out of the relay box. The sensor is pushed in between the fins on the evaporator coil. Take a photo of its location, then gently pull on the sensor to remove it from the evaporator. Don’t pull on the wire, pull on the sensor.
Once the freeze sensor is removed, you can remove the relay box. It may not be necessary to remove any of the wires from the relay box, but take a couple photos anyway. Let it hang down. Remove the 9 pin connector from the relay box. This is the connector that supplies power to the blowers, compressor, etc. The A/C unit is now ready to come off.
Back on the roof, I placed a couple pieces of plywood down so I wouldn’t punch holes in the roof. We basically just rolled the old unit over on its side and onto a plywood.
Getting the old unit off the roof was easy. We tied a rope around it and set it over near the ladder. With one helper on the ladder and the other on the roof, we placed the unit on the ladder and slowly slid it down.
Getting the new unit on the roof was just as easy, I left the new unit on its small shipping pallet for the trip up the ladder. I duct taped the unit to the pallet so it wouldn’t slide around. I tied a rope around the unit, then placed it on the ladder. One helper on the roof pulled it up and the other helper climbed the ladder pushing it up.
Once on the roof we removed it from the pallet and placed it over the opening. From inside the motorhome I could center it in the opening and then install the metal plate with the four large bolts. Tighten the bolts a couple turns in sequence. There are several height guide tab on the gasket. Snug the bolts down until these guide tabs just make contact with the roof. This compresses the gasket to the ideal compression
Reassemble the relay box in the unit. push the freeze sensor into the evaporator fins in the same location as it was removed. Plug in the 9 pin connector, and its ready for a quick test before putting the ceiling duct work back together.
Consider this if you’re planning on replacing both units. Put a 15k in the front and a 13 k in the rear. I did not replace the rear A/C unit as it is working great. However, as a work of caution. If you have a 30 amp coach and plan on replacing both A/C units, I would NOT replace both units with 15k BTU units. Two reasons why:
1) With 30 amp service, I can run both of my A/C units at the same time, my new 15k and my original 11k A/C unit. I draw under 23 amps when both units are running. However, if I installed two new 15k units, I’d be drawing about 28 amps. This is right at the limit before I start SHED-ing.
2) A 15k unit running in the rear bedroom will turn the back of the coach into a walk in cooler and the unit will be constantly cycling.
NOTE ON HEAT PUMPS
The only difference between a regular A/C unit and a heat pump is the reversing valve. This valve reverses the flow of refrigerant so the Evaporator is now the condenser, and the condenser is now the evaporator. This is a small valve that’s controlled by 110 volts. We’re working on a small circuit board that will control this valve as part of the Waiter ECC system. Hopefully we’ll have something tested by winter.
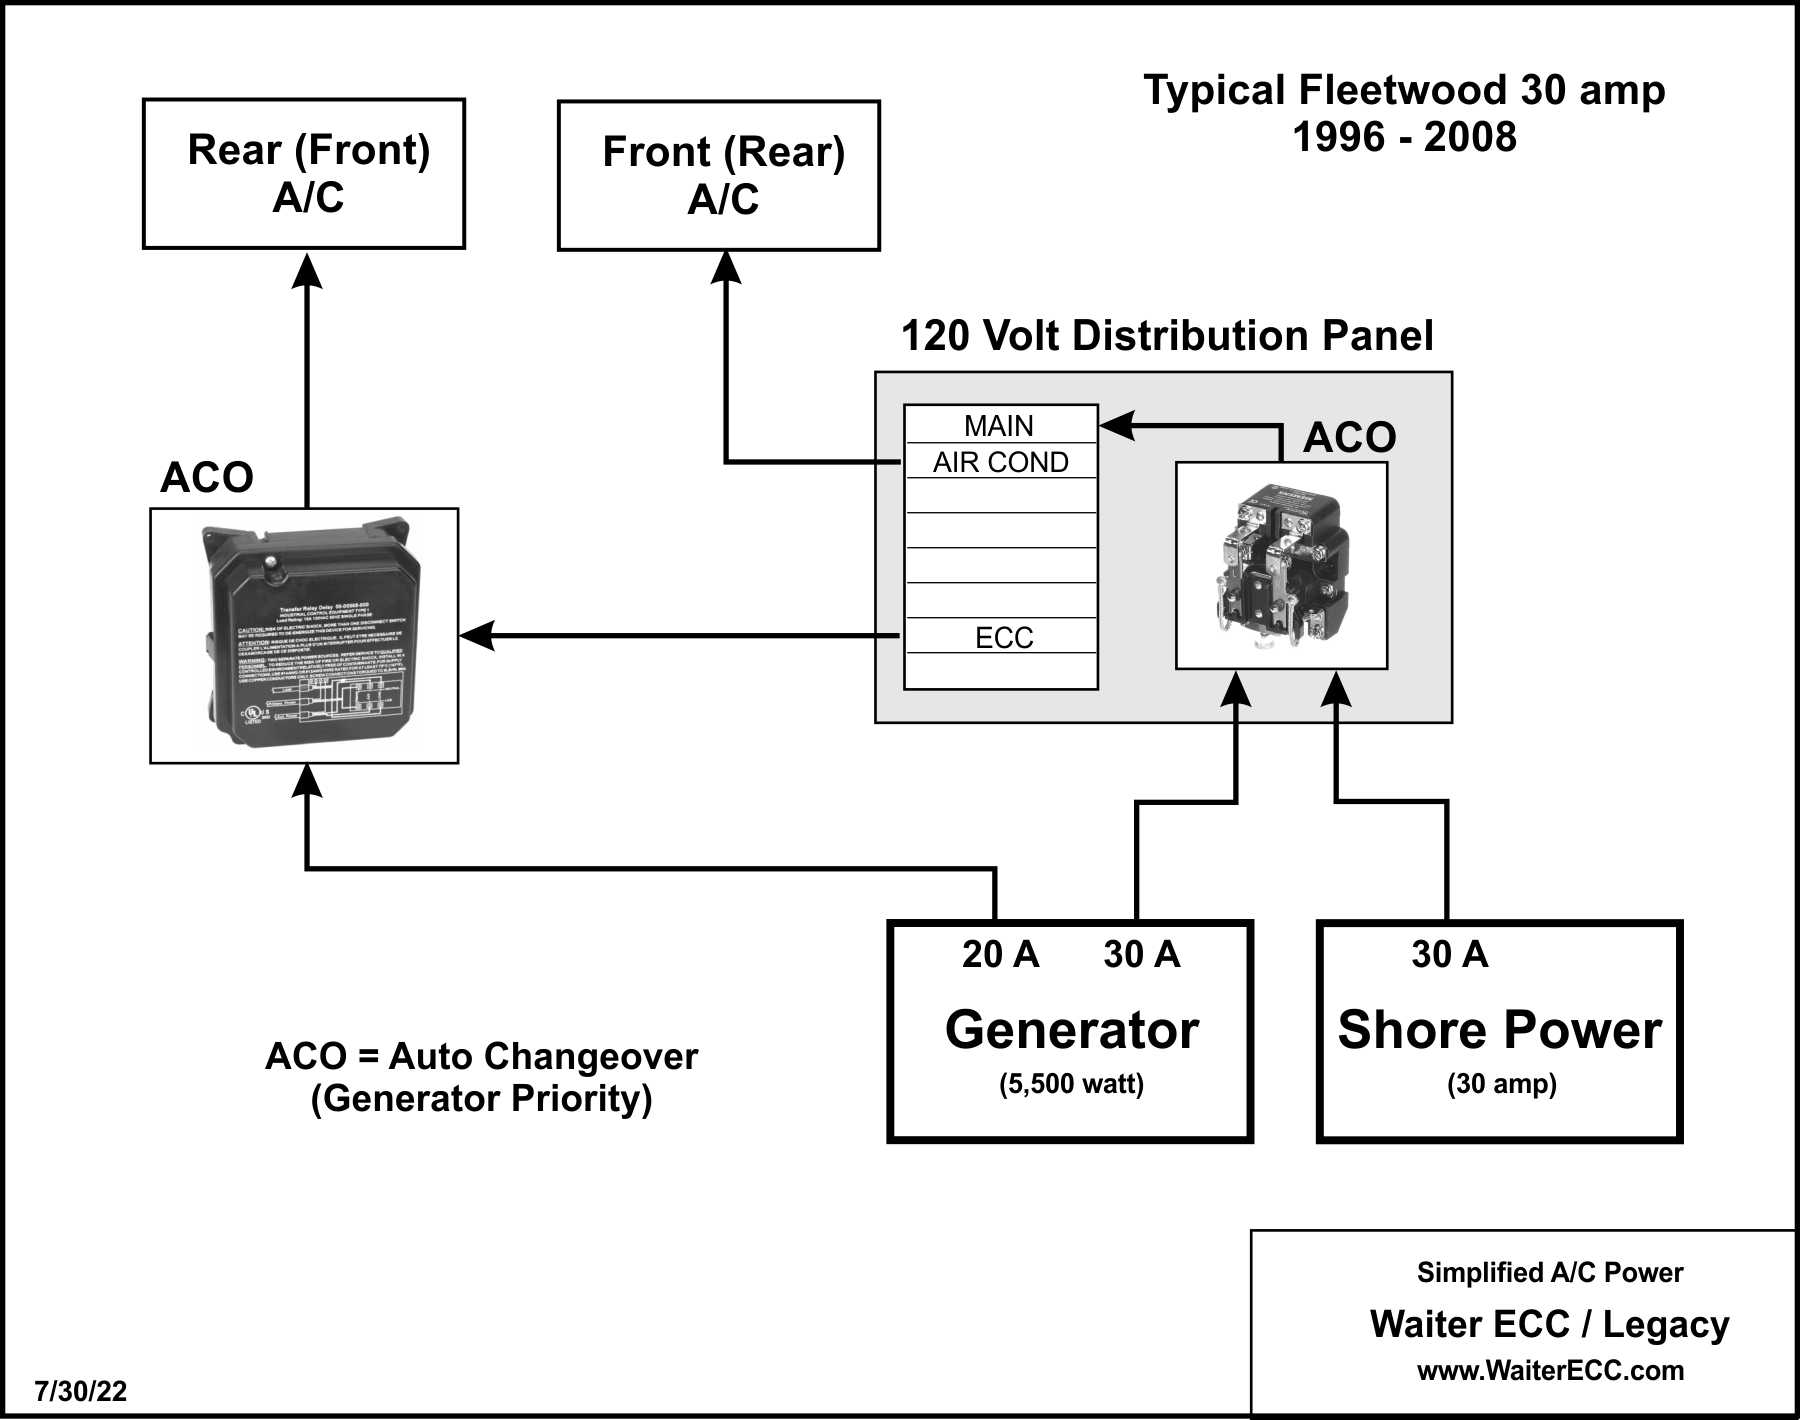
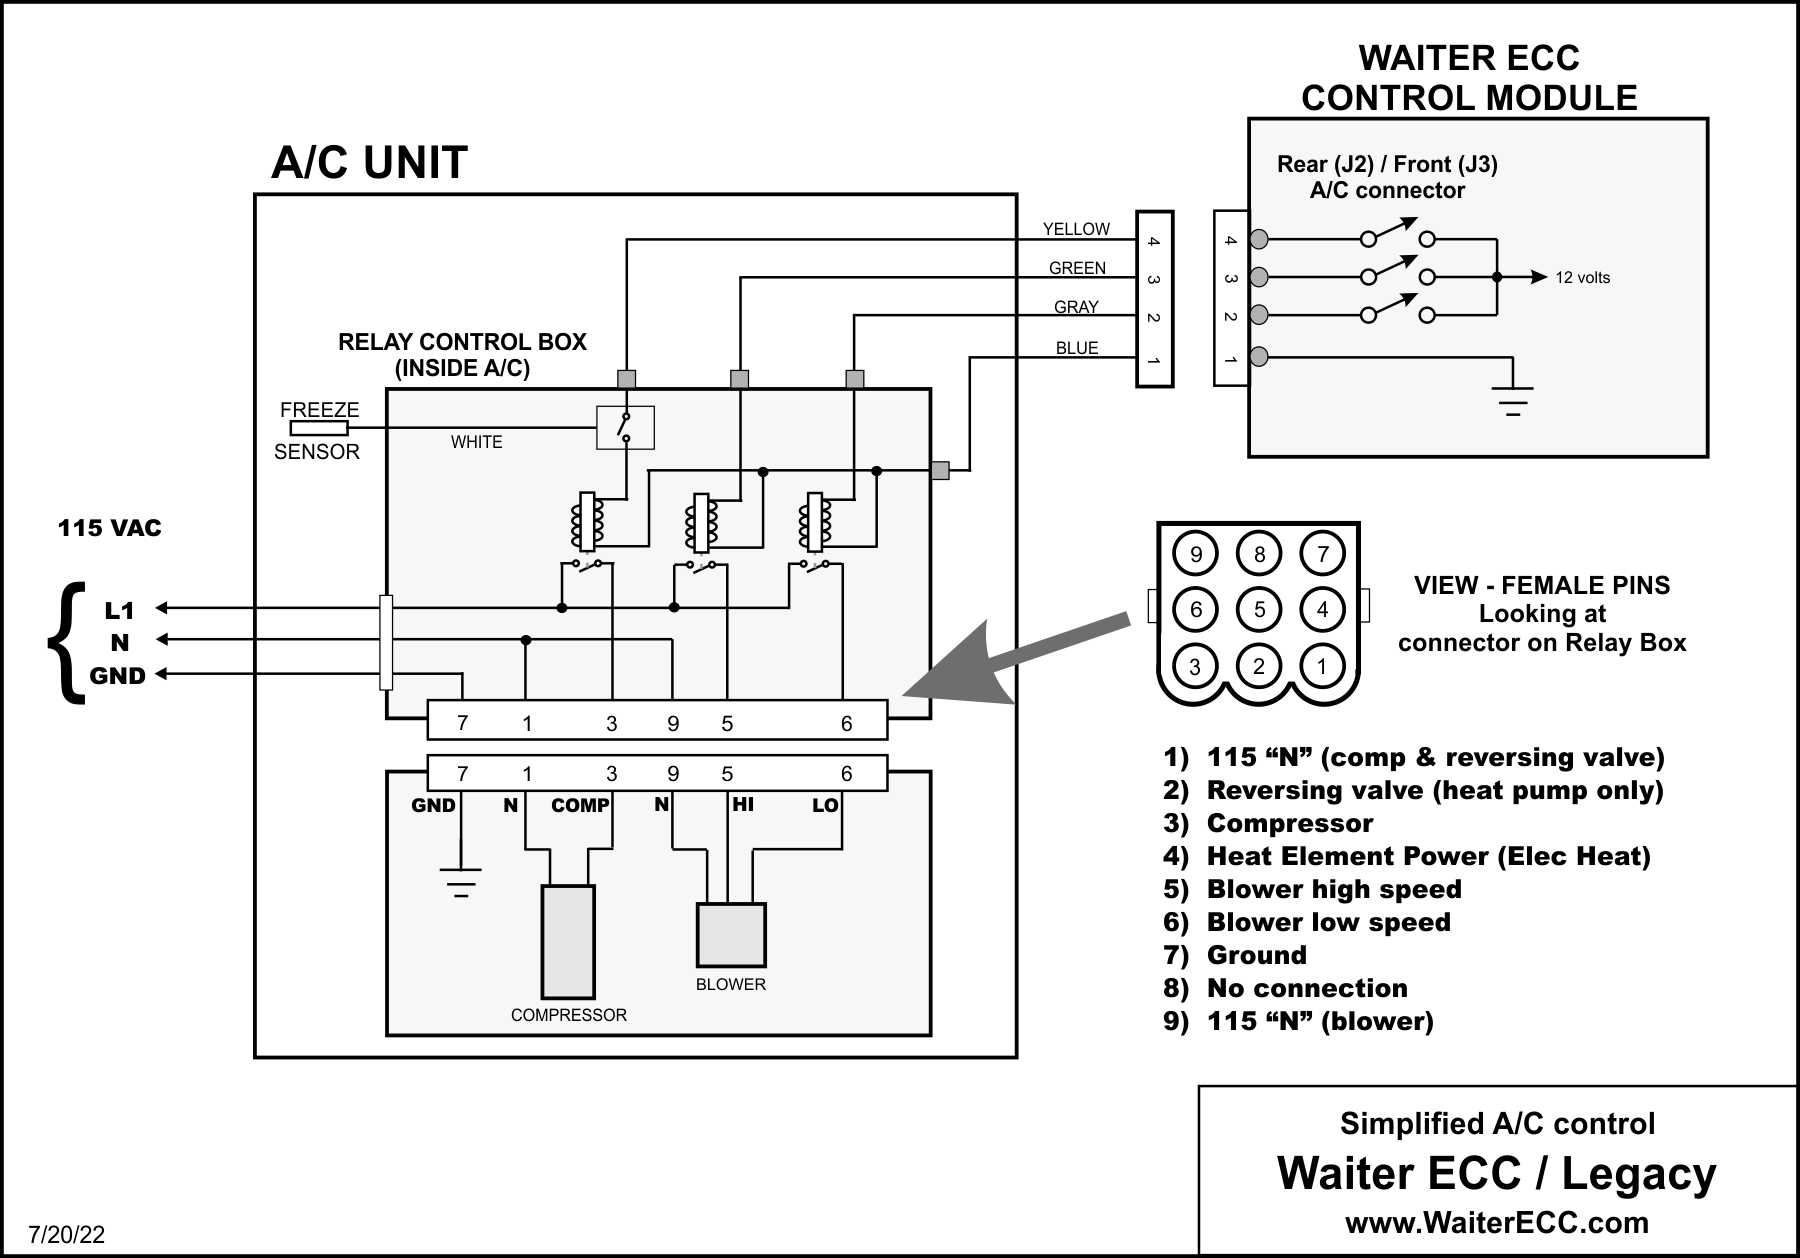
A/C UNIT POWER AND CONTROL
Regardless if you’ve replaced your old original Intellitec ECC thermostat with a new Waiter ECC unit, the two diagrams show how 120 volts is supplied to the A/C units and how they’re controlled.
I like the yagi in the background. Is that just for TV, or do you work DX on UHF?
Detroit TV stations 75 miles away.
75 miles? That’s a long haul for UHF. There’s a station in Santa Barbara (about 100 miles from here) that I’d like to bring in, if for no other reason than their chief engineer doesn’t think I could do it.
But, as far as projects go, it’s a low priority, especially when it would be merely for the bragging rights (and we do have a few TV stations here in LA).
Anyway, I like your antenna setup, and more importantly, I now know how I’ll go about getting my AC units down when I go to seal my roof.
Thanks.
I’m interested to hear more about your Waiter system controlling the heat pump. I have a 2000 Southwind and our front A/C isn’t working so I’m likely going to have to replace it as well.
I already plan on buying you Waiter ECC, but I’d love to have the option to run the heat pump with it as well. Thanks
I’m working on a heat pump controller that will talk to my Waiter ECC. Hopefully have something in a couple months
Any update on when the heat pump controller will be ready?
We’ve proactively stayed in cooler weather this year to delay replacing our second A/C unit, but I’d still like to replace it with one that has a heat pump alongside your Waiter ECC in the next couple of months.
Thanks
Any update on the timeline for the heat pump controller?
I’m replacing our front A/C this fall and would love to have the ability to run a heat pump with your Waiter ECC this winter. Thanks
Do you currently have a Waiter ECC system??
Any mid term results on the ac? 100+ Texas heat too much for the ancient unit on my 99. This Coleman sounds good.
Btw, the waiter ecc has been working great for several years now! Thank you.