
GAS GAUGE DOESN’T REGISTER CORRECTLY
July 19, 2020
For the last couple years, the gas gauge was intermittent and would go to empty or low value . I knew I’d probably need to drop the tank and install a new sensor, but I didn’t want to put any more time or money into this car unless I could fix the rusted out engine cradle mounts.
Now that I have the engine cradle mounts repaired, it was time to tackle the fuel gauge problem. This car has two fuel sensors and one fuel pump, I replaced the main pump assembly four years ago, so I suspected the problem was the aux sensor. Unfortunately, the sensor on the main pump I replaced is bad. I can see the fingers are missing that rubs against the resistor.
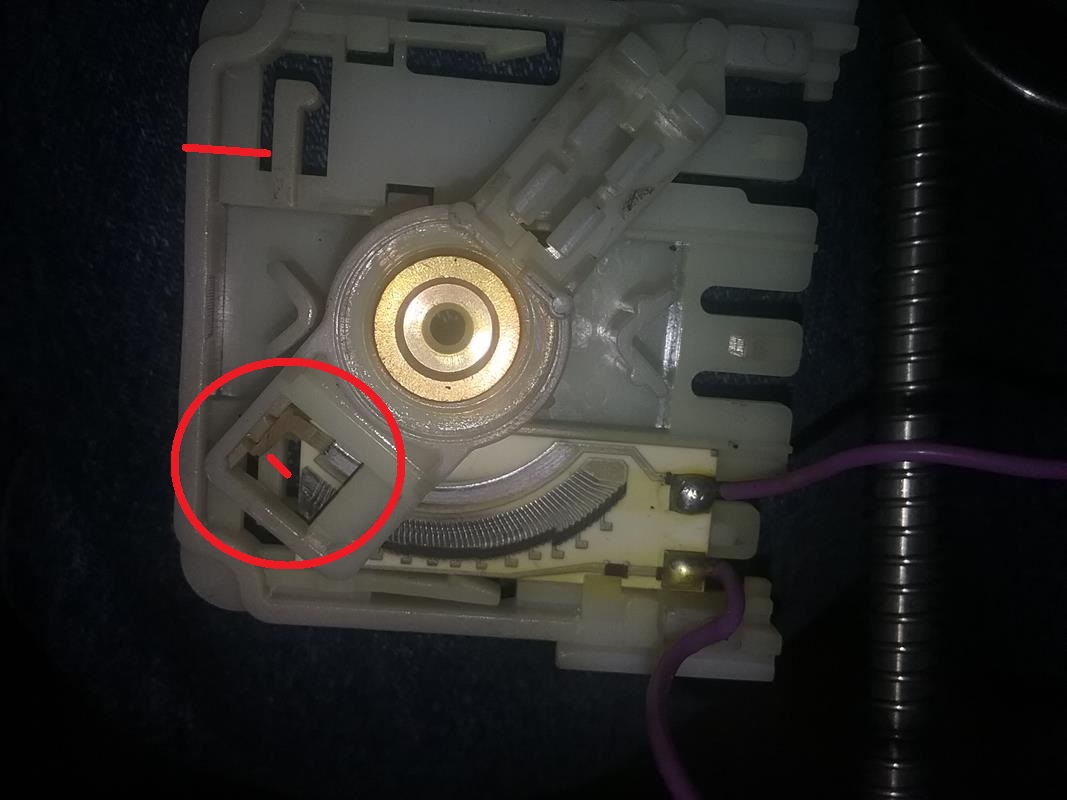 NOTE – I can see how the fingers got broken off. If the tank was full, the float would swing all the way up. If the float and swing arm were positioned just right at the end stop, the fingers could travel off the resistor and possibly get caught on the edge of the resistor. You can see in the lower left, the small red line is where the fingers were supposed to be. you can see that they probably went off the end of the resistor. Then as fuel was used, the float would start moving down and bend/break the fingers. If the new sensor was identical, I was going to put a small wire tie through an opening on the end of the sensor frame. If you look at the top left, that opening is identical to the one on the bottom and the red line shows how the wire tie would be positioned when installed on the bottom opening. By placing a very small wire through the opening on the bottom, the swing arm would not be able to travel all the way to the end and prevent the sensor swing arm and fingers from traveling all the way to the end.
The new sensor was a little different, the fingers could not over travel when the got to the end. so I installed it without any modifications.
I visually inspected the other sensor. It looks OK and when I check it with a meter, the sweep worked OK. It read about 100 ohms when empty, and a little over 200 ohms when full. SO, I’ll replace the pump assembly again. I ordered a new one from Amazon.
Drain as much as possible from the tank. Since the fuel pump was working OK, I’d use it to pump fuel out of the tank. I removed the shrader valve from the fuel injection line under the hood and placed a hose over it. I then removed the fuel pump relay and shorted across the contacts to run the fuel pump.
Removing the tank is fairly easy straight forward:
- Raise the rear car off the ground. I needed about 18 – 20 inches of clearance in front of the rear wheels when I slide the tank out.
- Remove the right rear wheel to get to the tank and electrical connections.
- If you have a 4wd, you’re going to need to drop the driveshaft. Mine is a 2wd, so I can’t give you any advice on this.
- Disconnect the plumbing and connector in the passenger rear wheel well. (two hoses and one electrical)
- Then the plumbing and connector to the charcoal canister. (three hoses and one electrical). There is an electrical connector on top of the canister, The release is on the top, I was able to lift the release a little and slide the connector off.
- Disconnect the fuel line that comes out of the filter and goes forward to the engine. Th filter will stay with the tank when it comes out. There may be a bolt on the fuel filter mount bracket that may need to be removed.
- Remove the rubber exhaust system hangers so the exhaust system will lay down.
- Remove the four bolts that hold the tank and shield up.
- The tank and shield straddle the exhaust pipe. I slide the shield forward so it would be out of the way.
- I pushed the tank toward the drivers side and out from under the car.
- Clean all the crap off the top of the tank and the locking ring. Wire brush, compressed air, etc. I sprayed PB Blaster on the locking ring.
- I used a screwdriver and tapped around at different locations on the ring to loosen it evenly.
- The old pump assembly didn’t want to fit through the hole, it had swollen a little. I had to disassemble the assembly to get it out.
- I removed the other sensor using the same process, wire brush, clean than tap the ring to get it off.
I removed the the other sensor to look at it and verify it was OK. Using an ohmmeter, the sensors reads about 200 ohm when full and about 100 ohms when empty. I also verified the new sensor read the same thing.
Clean the o-ring groove, then apply a thin coat of silicon paste to the oring, lay it in the groove and carefully install the pump assembly, verify the oring is still in the groove. Hold downward pressure on the assembly while getting the ring started.
Reinstall the tank in the reverse order, using anti seize on the bolts.
I dumped 4 gallons of gas in the tank, turn the key to ON, the pump will run for a couple seconds. do this 4 – 5 times to get fuel into the system. The fuel guage showed 1/4 tank, which is reasonably accurate for 4 gallons. I went to the gas station and put in 4 gallons at a time and checked the gauge, after about 30 seconds, it showed 1/2, then 4 more gallons it showed 3/4, then filled it up and it showed full.
Hopefully I no longer need to use the odometer as my fuel gauge
RUSTED ENGINE CRADLE MOUNTS
July 5, 2020
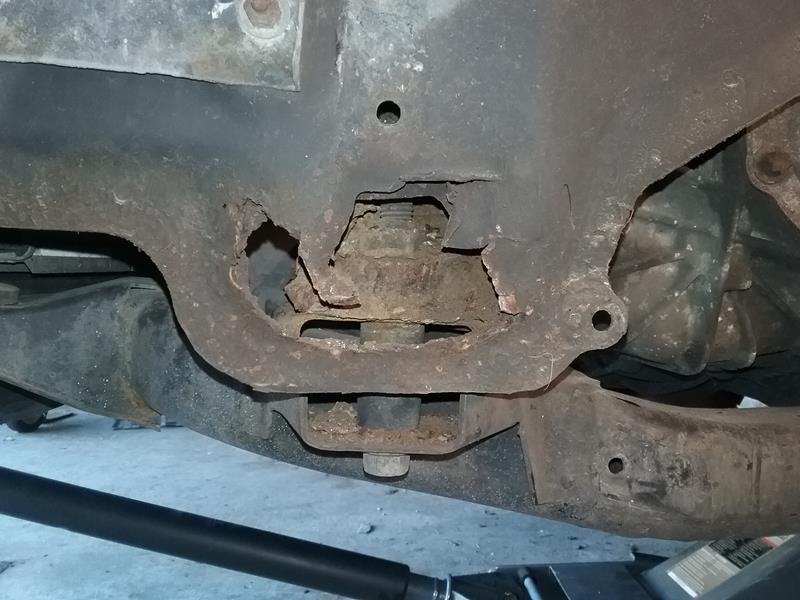
This is a common problem with Saturn Vue, the two front engine cradle mount pads rust away. These pads or “cups” rust from the inside out, so if you see any signs of rust on the outside, I guarantee they are rusted completely through. Use a screwdriver and start poking at the rust, be prepared to be shocked at what you see. The photo to the left is what I found after a couple minutes of poking. My mounting pads were completely rusted away with just a thin strip of metal on the back side holding it together.
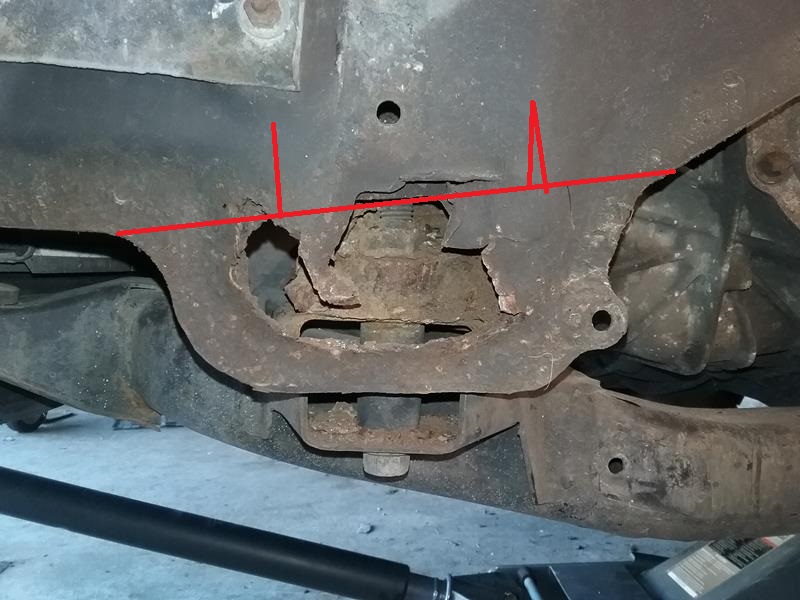
The front mount pads are at the lowest point of the sheet metal frame structure and form a “cup”. Of course, these “cups” fill with salt, water and debris. Then over a few years, they rust away from the inside out. The “cups” are made of sheet metal and are spot welded to a sheet metal frame that’s spot welded together. On mine, the “cups” were rusted away, but the sheet metal frame they were welded to wasn’t in to bad of shape. The drivers side had a small area that had rusted through on the underside of the sheet metal frame, directly above the “cup”, the passenger side looked fairly good.
With this damage, the only thing holding the engine, transmission, and drive train are the two rear bolts. This is a BIG safety issue and the vehicle should NOT be driven. If I couldn’t come up with a satisfactory repair, I made a decision that I’d have to junk the vehicle.
The repair had to provide a strong mount point for the cradle and be able to transfer loads into the sheet metal frame. Since the frame was weakened in some areas, the repaired mount also had to distribute loads over a wider area and strengthen the weakened areas. After weeks of thinking and looking at other options, I came up with a plan that might just work. I did a quick test fit using a shorter (7 inch) box beam to see if this would work. The final repair would use a rectangular steel tube, a box beam (2x3x12 inch x 3/16 wall thickness) welded to the underside of the existing sheet metal frame structure. The repair should easily last 10 – 20 years, even if this was a salty road winter car. (We tow the Vue behind our motorhome. It gets driven hard about 4 months out of the year in Arizona. The rest of the time it sites in a barn, out of the weather.
GET TO WORK
If you only do a visual inspection, the mounts may look OK with some surface scale rust.. However, if you want to really see whats going on, you’ll need to dig just a little. But remember, DON’T PANIC when you see whats really going on.
The rust happens from the inside out, so if you see rust on the outside, that means the metal has rusted completely through. To evaluate the damage, I used a pick hammer and started tapping around the metal pad. It literally fell apart as I tapped it. I did a rough cleaning up and pulled away the rusted metal and did an initial cleaning out of the debris. This is messy and there are a lot of sharp edges.
The goal is to remove the rusted out cups without damaging the underlying sheet metal frame. This would provide a clean flat surface that the box beam can be mounted to. I cut and ground to remove the remnants of the cups, being careful no to do any damage to the sheet metal frame structure. The inside of the frame lip and the bottom side had to be clean and flat. I ground thru most of the spot welds on the bottom. I cleaned up the frame so that my new box beam would fit flush and nicely up against the bottom of the sheet metal frame.
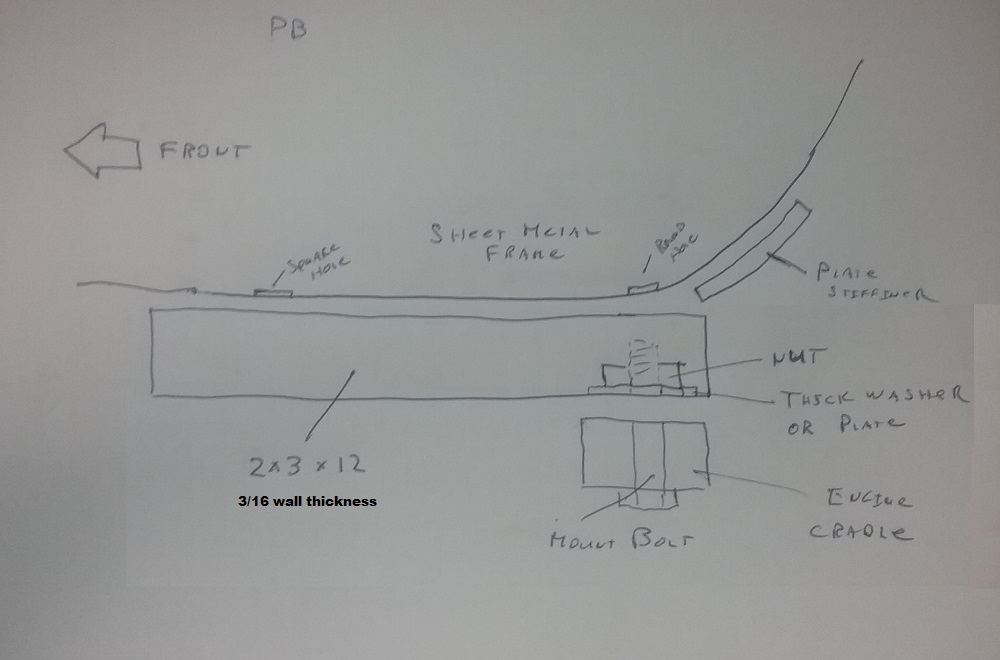
I positioned the box beam against the bottom of the frame and held it lightly in place with a floor jack. The box beam fit snugly against the bottom and also the lip. I then used a small hammer to tap it into position so it was against the outside edges (the lip) of the frame sheet metal. I then tapped it toward the rear until there was about 3/16 – 1/4 gap between the box and the frame where the frame starts to curve upward. The 1/4 thick plate gets welded against the sheet metal in this area and fills this gap. When the box is mounted, the very rear edge of the box will rest on this plate and get welded to it. There will be a small open cavity between the box and the frame, but this should be OK.
Marking cradle bolt hole location.
Once the underside of the sheet metal frame is cleaned up, the box beam fit snugly and a good fit against the underside. On the underside of the frame are two holes, the round hole toward the rear is there to allow the cradle bolt to protrude up into the frame. This hole is a perfect guide as to where the holes in the box beam need to be for the cradle bolt. I carefully marked the hole locations on the box beam using the frame hole as a guide. This hole location is somewhat critical as its where the cradle gets bolted to .
The square hole toward the front of the sheet metal frame provides ventilation. I marked this location on the box. Its not as critical.
I then drilled the holes through both sides of the box beam. The diameter is a little oversize to allow for minor deviations when positioning the box beam so the cradle bolt will line up with the hole.. If the original bolts are used, the bolt will go through the bottom hole in the box, and may protrude up through top hole and into the sheet metal frame. thats why the hole was in the sheet metal frame.
When doing the final alignment before welding, I held the box beam firmly against the bottom of the frame with a jack. I made sure the box was against the lip, and centered the bolt hole in the box beam with the hole in the sheet metal frame. I then put a couple tack weld to hold everything together and removed the jack.
 The box can be welded to the sheet metal frame on both sides. In the area of the original cups where the outside layer of sheet metal sticks out about 1/2 inch. I cut a 1 inch long slit in the outer layer of sheet metal at its bends ( see photo). I could then bend the sheet metal in these areas so it was against the inner layer of sheet metal and the box. I then welded the sheet metal to the box and welded the slits closed.
I made two plates that would help clamp the box beam and distribute loads. One plate 2x2x1/4, goes inside the box beam and acts as a big washer. The other plate is 2x3x 1/4. This fits between the cradle and the bottom of the box beam.I used the original nut plate (it goes inside the box). A wrench easily fits into end of the box to hold the nut plate while tightening the cradle mount bolt.
I used paint and frame sealer everywhere to help slow down future rust.
Once the repairs are made and the new mount is welded and painted, the cradle can be lifted into position. Loosely install the four bolts and the new hardware on the front mounts, then tighten everything up.
SATURNFANS FORUM LINKS
As I was working on my Vue, I posted a lot of stuff on the Saturn Fans forum. Here are some links that may be helpful:
New to Me Saturn Vue
Difference between Auto / Manual wiring harnesses
Replace Exhaust Manifold
Replace Water pump
Replacing Manual Transmission Shifter Cables
Replace brakes, cylinders, shoes, pads, hoses
Fuel Line Replacement (scroll down to post #9)
Identify throttle body vs Fuel injection connectors (Scroll down to post 16)
Replace Front Struts
Speedometer jumping / occational miss / hesitation
Disable steering column lock for towing
Bypassing the Passlock system
P0171 code – cooling fan runs when code set
Best $30 a DIYer will ever spend
2.2L Timing Chain and Tensioner
P0420 – Catalyst System Efficiency Below Threshold (Bank 1)
Air Bag Light coming on more often
Oil Leaks
Replace Cabin air filter
Rear Deck Cover
Replace Clutch
Bleed clutch cylinder
Vue tow baseplate install (scroll down to post #31)
Engine cradle replacement