
UPDATE Apr 2020: Finially back home, rechecked track bar bolts, all secure, no wagging. On way home and we drove at speed limit (75 – 80 mph).
UPDATE Dec 2019: We just finished a 2500 mile drive from Ohio to Arizona. There was a significant and noticeable difference in the handling. The back end shifting and wagging was completely gone. However, on the last day of travel, I noticed what I thought was the back end seemed to be doing its shifting around (though not as bad as before the track bar). After we arrived in AZ, I did an inspection and found the bolt that ties the link to the frame bracket was loose and allowed to move. I suspect this was the cause of the shifting. I removed the bolt and reinstalled it so I could get the wrench on the nut better. I’ll keep an eye on it as we continue our travels.
By far, the single best improvement to the F53 chassis for sway control is the Cheap Handling Fix (CHF). When the motorhome is hit from the side by a gust of wind or a truck passing, this tilts the motorhome sideways, which causes the steering to wander in the direction of the tilt, usually requiring constant steering input from the driver. The CHF corrects some of this by working to keep the vehicle from tilting sideways in relation to the axle.
Another factor that impacts steering is the body of the motorhome shifting slightly sideways on the axle. The motorhome frame is mounted to the rear axle via leaf springs and rubber bushings. There’s enough flexibility in the springs and bushings that the motorhome and frame can shift side to side a small amount in relation to axle. When the rear body moves slightly sideways, its pivoting on the front wheels. The front wheels are now pointed in a new direction and requires the steering input from the driver to straighten out. When the driver corrects, the body now shifts a little in the other direction and once again, steering correction is required. And so it goes, the tail is wagging the dog.
This “tail wagging the dog” is aggravated by longer chassis that have a long overhang or towing a toad. Also, on older motorhomes the bushing and springs aren’t as stiff as they used to be. Its been reported that a track bar mounted on the rear axle makes a significant improvement in the drive-ability and constant steering control. A track bar significantly reduces this sideways movement of the rear axle by connecting it to the frame via two swivel joints.
Track bars are available commercially or can easily be manufactured by anyone with basic mechanical skills. The goal of the track bar is to keep the frame tracking straight with the axle. It does this by mechanically connecting the axle to the frame so the axle cannot shift sideways.
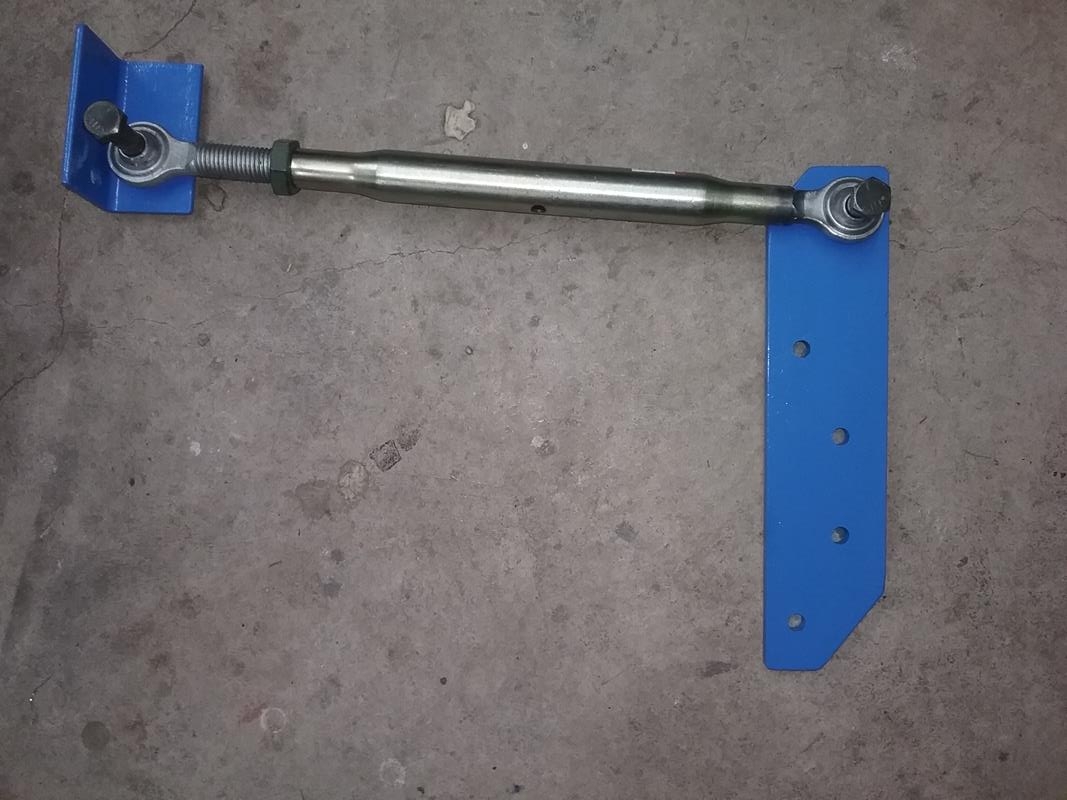
My F53 has a S135 differential. This is probably one of the easiest differentials to make a track bar for as the differential plate can be made out of simple steel bar with no fancy cuts or curves. The swivel link bar is available at any Tractor Supply for $22. Its adjustable to any length from 21-27 inches.
I did an initial fit check to make sure things would fit, and also see what frame modification I needed to do.
- The differential plate and bolts would clear the existing sway bar.
- I need to relocate the brake line on drivers side so it wouldn’t hit the differential plate or link.
- I need to grind off some casting numbers on the differential so the differential plate would mount flush against the differential.
- The L bracket would mount to the passenger side frame, no clearance problem
- The swivel link should be mounted so that its parallel to the axle under normal operating loads. This reduces the slight sideways movement the bar induces into the axle as it swings up and down.
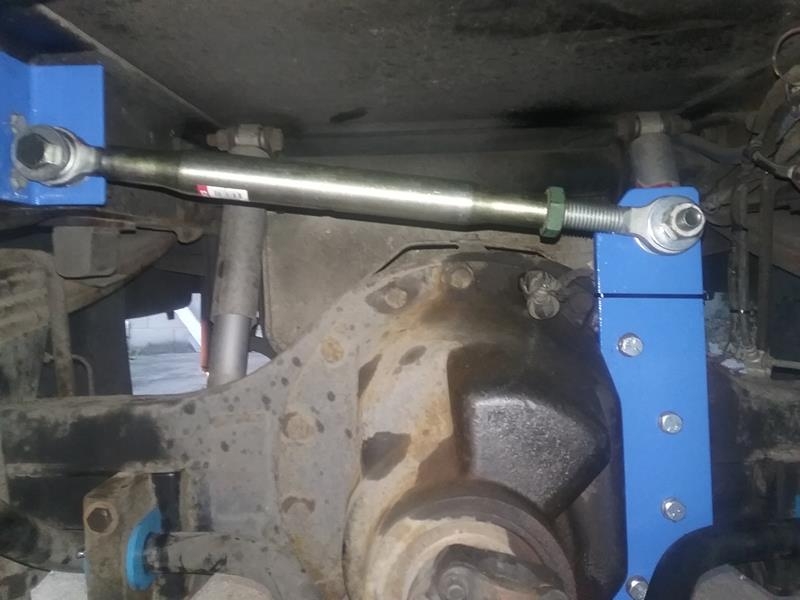
- Weld the reverse thread fitting to the link bar. Adjustments will be made with the normal thread and then locked with a jam nut
- IMPORTANT – The link adjustment holes need to be vertical so they cannot collect water, pay attention to this when welding the reverse thread fitting

PARTS NEEDED
- 1/2 x 4 x 17 inch steel bar – used to make differential plate
- 1/4 x 3 inch “L” bracket. I made one, but I understand this may also be available from Tractor Supply
- Swivel link CAT 1 from Tractor Supply
- 4 each 1/2 x 2 inch bolts for the differential plate mounting
- Lock nut for the swivel link
- 3/4 bolts to mount swivel link to differential and frame. 2 bolts, nuts washers for swivel links
POSITIONING THE TRACK BAR
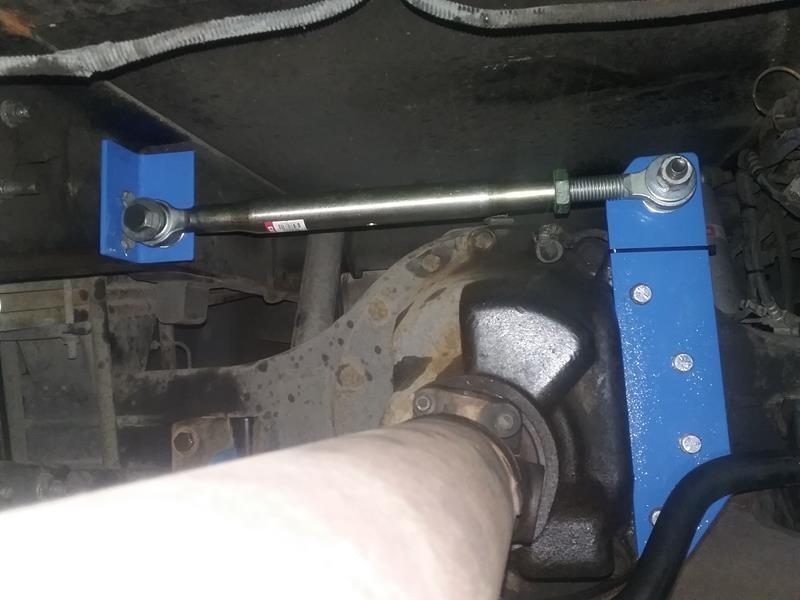
As the axle moves up and down in relation to the frame, the swivel bar link pivots at the frame and swings up and down. As it does this, it will introduce a small amount of side to side travel of the axle in relation to the frame.
 Although it isn’t critical, to minimize this side to side travel, the track bar system should be mounted so the link bar is parallel to the axle and frame when the coach is loaded and air bags inflated for the normal traveling conditions. In other words, the frame bracket and the differential plate need to be mounted so that when the coach is at it normal loaded wight and air bags are inflated to their normal pressure (if you have them) the swivel link bar that connects the two should be parallel to the axle.
MAKING AND INSTALLING THE TRACK BAR
- Temporarily remove the sway bar. (I installed new bushings when I reassembled it)
- Drain fluid from differential. (Re-use the fluid or install new fluid when finished)
- Grind off casting numbers on the differential so the plate will mount flush.
- Remove four bolts on drivers side of differential. These will be replaced with longer bolts when mounting the plate
- Clean area with brake clean
- Using aluminized duct tape, cover the side of the differential. Place the edge of the tape about 1/8 inch from the curve on the differential.
- Use a ball peen hammer over each hole, tap the ball-peen with another hammer. The ball peen will cut a hole in the aluminum tape.
- Peel the aluminum tape off of the differential and place it on the differential plate.
- Drill the four holes in the differential plate, These are slightly oversize, 9/16 inch
- Test fit the plate on the differential with the four bolts, You may need to drill some of the holes larger if the centering was off
- Align the “L” bracket on the frame and drill the mount holes. I use 1/2 bolts for the “L” bracket. IMPORTANT – Use either a plate or large thick washers on the outside of the frame. These are needed to distribute the loads to the frame.
- Swivel links – I welded the reverse threaded fitting because I couldn’t find a reverse thread lock nut. If welding, make it so when the link is mounted in its final position, the adjust holes are vertical to allow water to drain out. Otherwise water could get trapped inside , freeze, and bust the link.
- Paint the differential plate and the “L” bracket for corrosion protection
- Mount the bar to the differential and the angle to the frame. Use 2 inch bolts on the differential, place sealant on the threads.
- Re-fill the differential with oil
- With the wheels on the ground, and normal weight in the motorhome, adjust the link, bolt it to the differential bar and the frame angle.
- Tighten the jam nut on the link.
- Remove the bolt and nut that hold the brake line bracket to the frame.
- Gently bend the brake line so that the the hose points toward the rear.
- Reinstall the bracket so it mounted on the bottom surface of the frame, not the top surface. This will allow you to point the hose /tube toward the rear.
- Route and secure the speed sensor wires so they cannot interfere with the track bar.
Love what you do and post. Will be converting my mh to residential fridge soon as you did. I am a retired school bus mechanic and and very impressed by your abilities and talent. I would like to see you use grade 8 bolts on your track bar project,grade 5 ismore than adequate for most things but there will be a large amount of force on this one! I would also monitor the frame mount bracket for stress cracks over time. Have seen bigger frames crack at stress points like that!
Frames are not fun to repair, been there done that!! Keep up the great information!!
Mike,
Interesting comment concerning the frame mounted brackets cracking over time. This is what I’ve always done on a frame mounted bracket. I install a matching (1/4″ or 3/8″) plate the same size as the bracket base plate placed on the opposite or street side to prevent or lessen the cracking. Essentially that would sandwich the bracket between two pieces of heavy metal and spread out the bolt pressure.
I used large, thick, fender washers on the back side. A plate would probably be better. Just match drill a 1/4 plate when drilling the holes in the angle.
Could you make me the track bar i will pay
Sorry, Not able to at this time.
Pingback: Improve handling of F53 chassis - 1999 Southwind 35S
Pingback: Upgrade report - A little more power and better fuel economy - 1999 Southwind 35S
Are the home joints necessary (swivel end links) I am a marine tech and have heavy stainless tie bar used to tie the steering of high horse power outboards to gather, that is perfect length.
I’d say yes, they are needed. Theres a lot of movement / swiveling as the axle moves up and down in relation to the the frame.