
Last year I was having all kinds of weird problems with my furnaces and air conditioners. The furnaces would come on even when they were turned off. I’d get clicking sounds coming from the Intellitec control module. Every now and then I noticed weird buzzing sounds from the A/C unit, I finally figured out it was trying to run both hi speed and low speed blowers at the same time.
It got to the point that I’d unplug the furnace and A/C unit connectors from the control module when the motorhome wasn’t occupied. I called Intellitec, they were very helpful and explained that they didn’t make these parts any more, but could offer a repair. For a fee, they’d put the boards on the test bench and see if they could repair them, but there was no guarantee they’d be able to do anything. If they could repair my boards, there’d be additional charges for the tech’s time, and there was no guarantee on the boards.
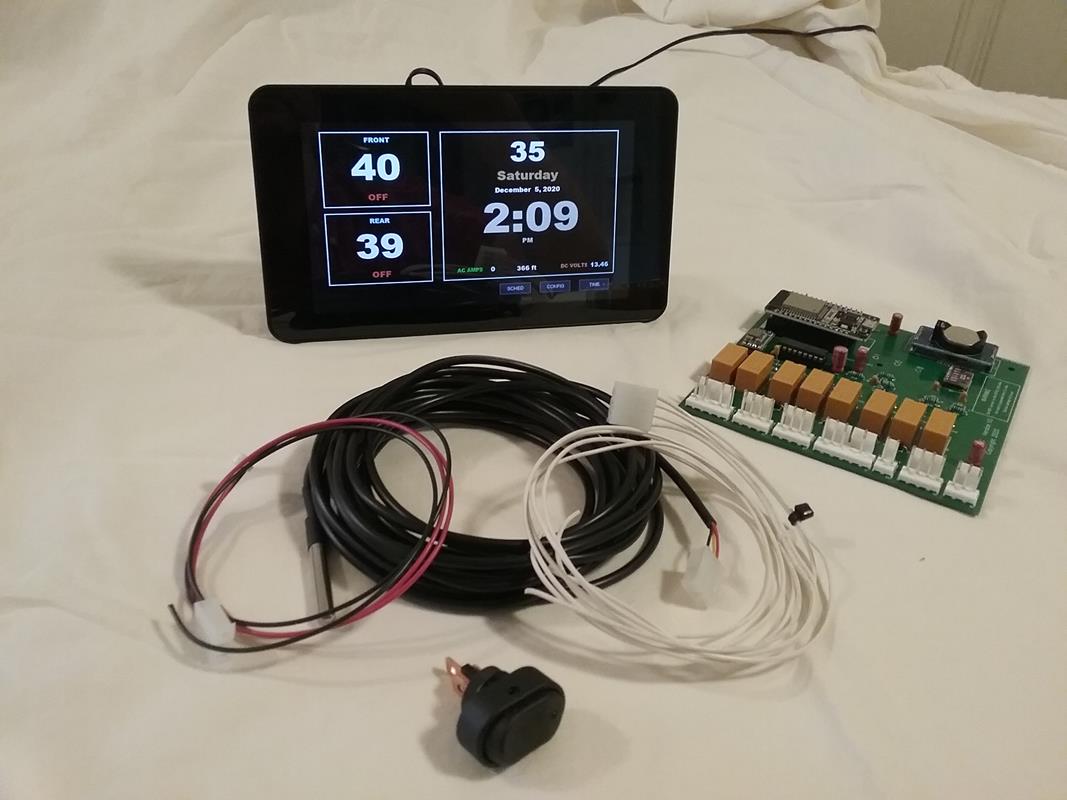 When faced with a $400 – $500 charge for repairing a 20 year old system, with no guarantees as to how long the repairs would last, I started exploring other options: I design and build computer control system for industrial equipment, so coming up with something for my Southwind should be an interesting challenge. What I came up with is a very nice electronic state of the art system for about what it would cost to repair my 20 year old Intellitec system.. Waiter’s ECC.
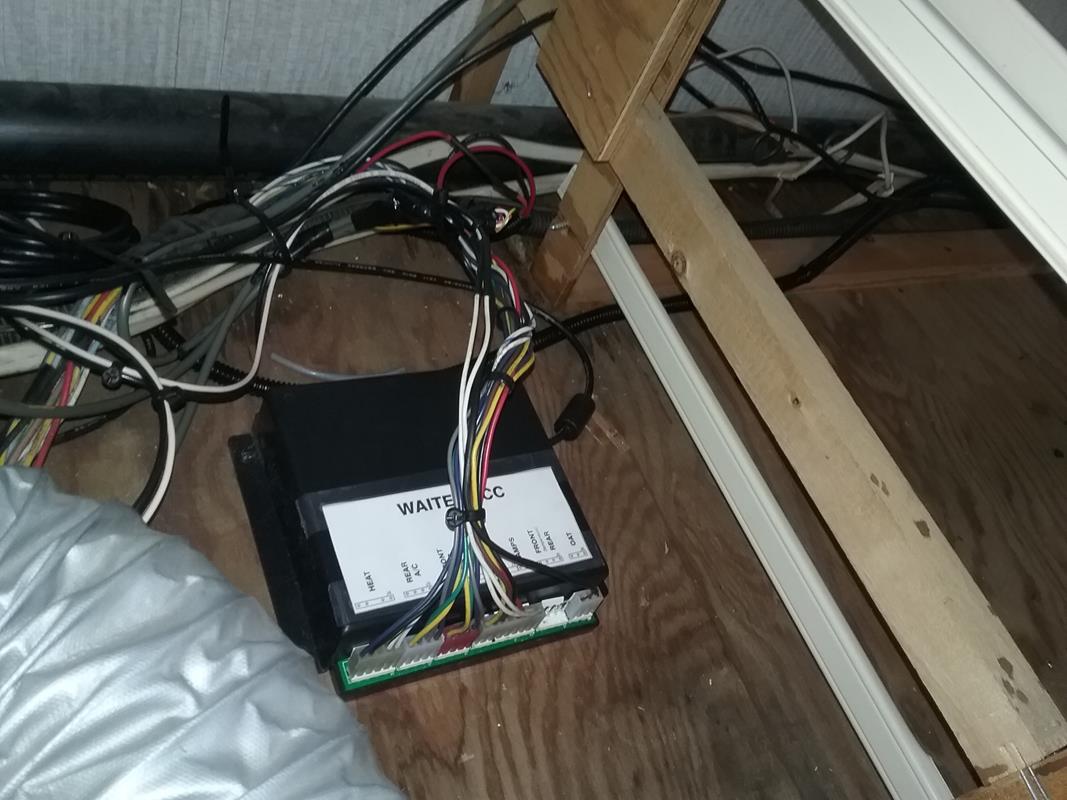
Before beginning any project, I take a LOT of photos. This documents what I’m doing, but more importantly, serves as a reference when I can’t figure out where something went or how it was originally connected..
IMPORTANT FOLLOWUP (Feb 2021) – Since performing the original installation, Waiter ECC has upgraded their system so its now 100% plug and play, no wiring required. WOW…
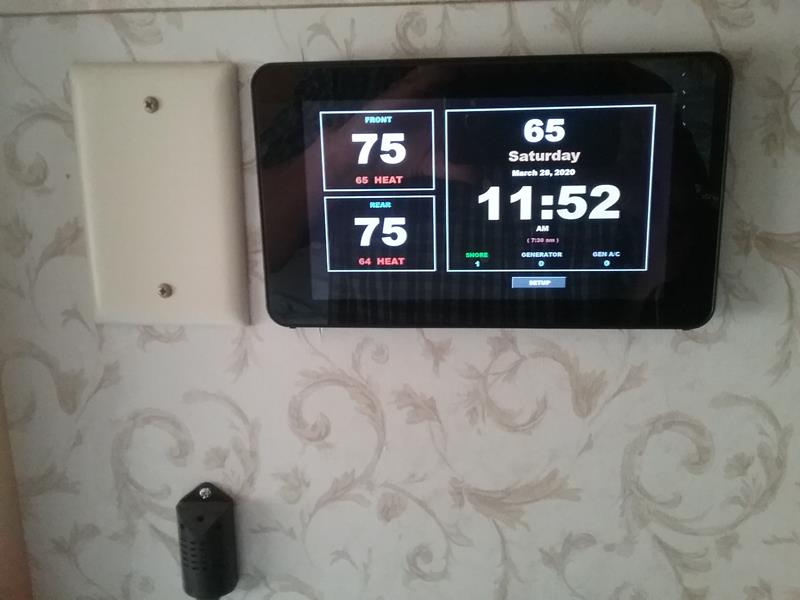
Installation is fairly easy. I re-wired the 12 volt power that feeds the control module to the touch screen and control module with a switch as per the instructions. In my case instead of rewiring the original temperature sensors, I installed new electronic sensors. If I had this to do over again, I’d do as the manual recommends and re-use the original sensors simply by re-routing their wiring. The new touch screen is installed where the original thermostat unit located. I had to enlarge the hole a little and used Valcro tape to secure the touch screen to the wall. The new control circuit board replaces the original board inside the original control module enclosure. All the original plugs for the old system plug directly into the new system and its ready to go. It took a couple minutes to verify the configuration, set the clock, and it was ready to go.
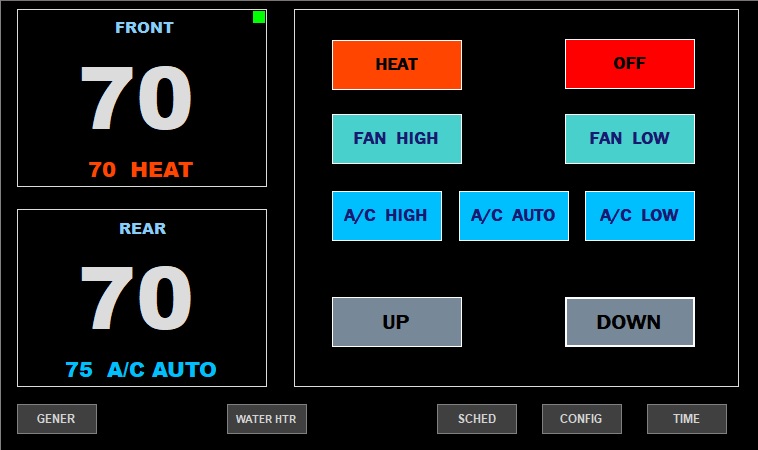
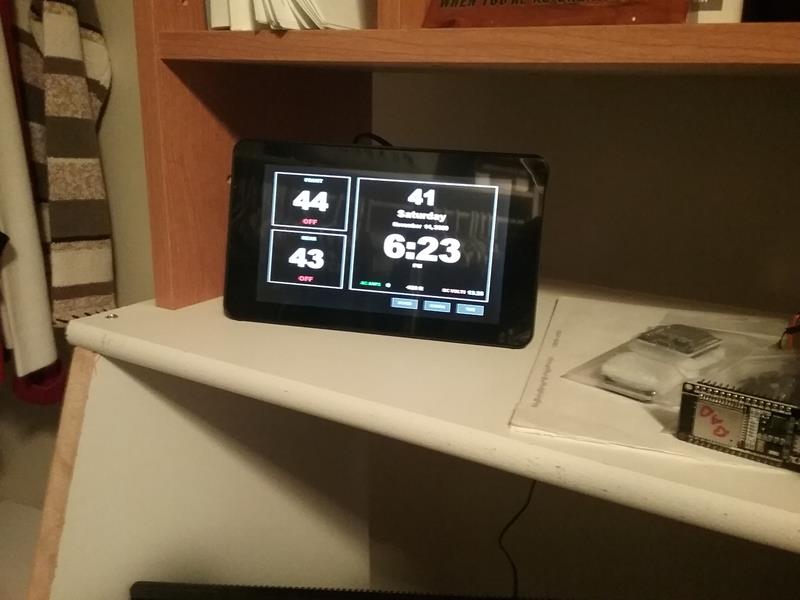
 The new touch screen is user friendly and doesn’t intimidate a non-technical user.. (See OPERATION) The main screen shows the front and rear temperatures, outside air temperature, what mode its in, what the set points are for that mode, the day, date and time. It also shows the command status for the furnace or A/C compressor (the little green dot says that its commanded ON). It also shows the 120 volt amps, the 12 volt DC volts, AND, even the pressure altitude (I’m a pilot, so I had to have that :-). ALSO – If the alarm clock is set, it’ll show what time its set for.
NOTE – For folks that prefer Celsius instead of Fahrenheit, you can change that on the CONFIG screen.
The display automatically dims after about 60 seconds. There are two DIM settings, DAY and NITE. Set the DAY to a reasonably bright setting so its still visible during the day, set the NITE setting so its very dim, I have mine set so in a totally dark room, I can still see it, but it doesn’t light up the whole room. If you touch the screen anywhere, it goes to full brightness.
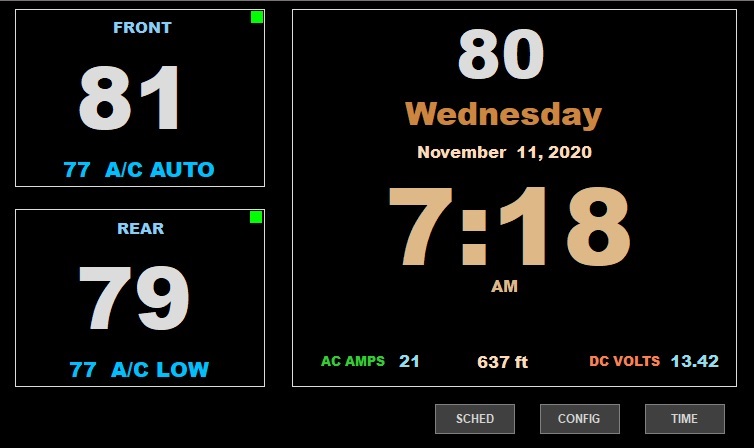 Changing temperature set points or modes is straight forward. Tap on the FRONT or REAR temperature area, and the mode button screen pops up. The text “FRONT” or “REAR” blinks to show what unit your commanding. In the photo below, the FRONT unit is set to HEAT with a set point of 70, and since the little green dot is lite, the furnace should be running. The REAR unit is set to A/C AUTO with a set point of 75 degrees. The system remembers what mode its in and also what the set points are. This is nice if you switch between A/C and HEAT, you won’t need to reset the set points when changing modes
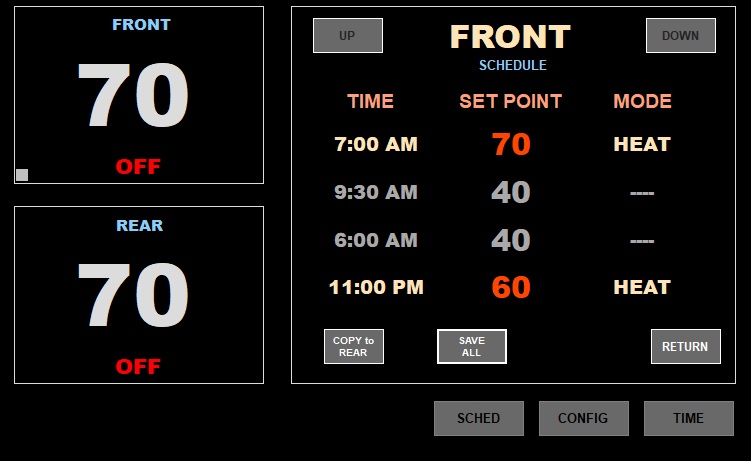
Another feature is SCHEDULES. The front and rear units each have four lines for a schedule event. In each line you can tell the unit what mode to switch to, what time to do it, and what the set point should be. The photo below shows the FRONT schedule. At 7:00 AM the mode will be set to HEAT and the set point to 70 degrees. Nothing happens in lines two and three (mode is set to “—-“), but in line four, at 11:00 PM, the mode is set to HEAT and the set point to 60. You can override this at any time by changing MODE or SET point on the main screen.
NOTE – See the little gray dot in the lower left corner of the FRONT temperature display window. That dot signifies that there are scheduled events for the front unit
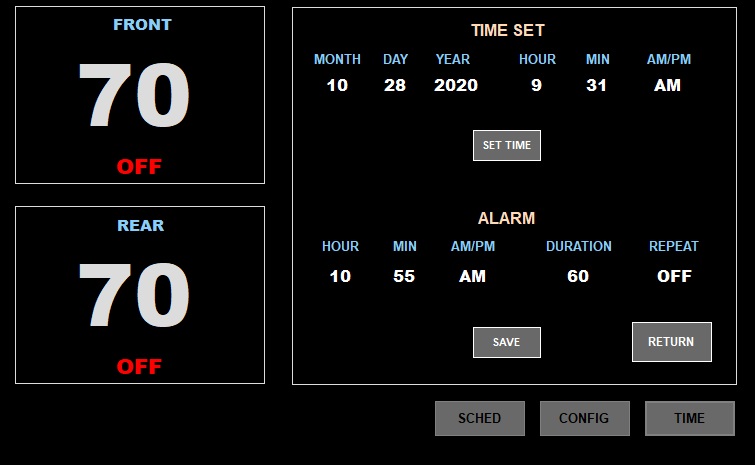
Setting the clock and alarm are done on the TIME screen. A battery backed up Real Time Clock module is mounted on the controller circuit card so the system doesn’t rely on internet connections to maintain correct time. The system doesn’t do automatic time zone or daylight savings time changes, so if you’re traveling, you need to reset the clock for these changes. The alarm clock can be configured to not go off, go off only once (the next day) or repeat every day. A reminder of this is shown on the main screen.
OPTIONAL REMOTE SCREEN (available now) – One of the neat advantages of this system is the ability to control/monitor it from multiple locations using different devices, as long as they’re MQTT compatible (See TECHNICAL) and can connect to the WaiterControl WiFi network.. The remote touch screen I used is identical to the main touch screen. The main screen is mounted on the Southwind’s bedroom wall, where the original control unit was located. I have the remote touch screen mounted on the wall in the living room where its easy to see while driving or when parked. I can change setting there instead of going to the back of the motorhome. While at home and the Southwind’s sitting in the driveway, I move the remote display to the inside of my house where it sits in a cabinet. Its communicating via WiFi with the main touch screen that’s inside the Southwind, about 40 ft away.
MORE TO COME – Waiter ECC is currently working on expanding the Waiter Control system unit to control more devices. Here are a couple examples of things to come:
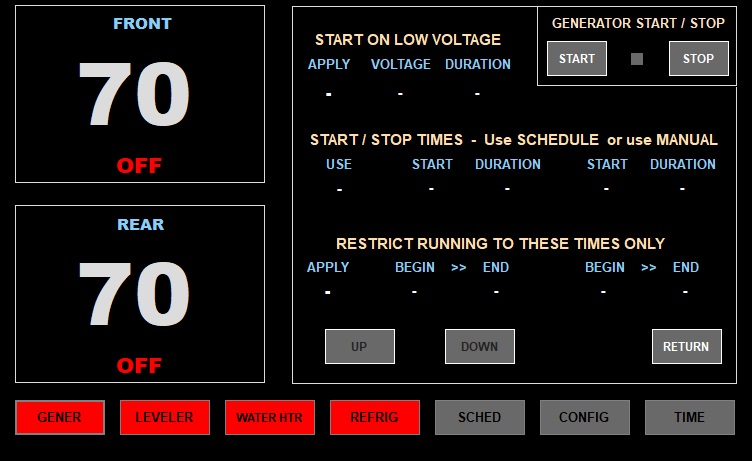
GENERATOR – Schedule run times, quite times, start generator if 12 volts goes below set point (re-charge batteries), and of course manually start and stop the generator
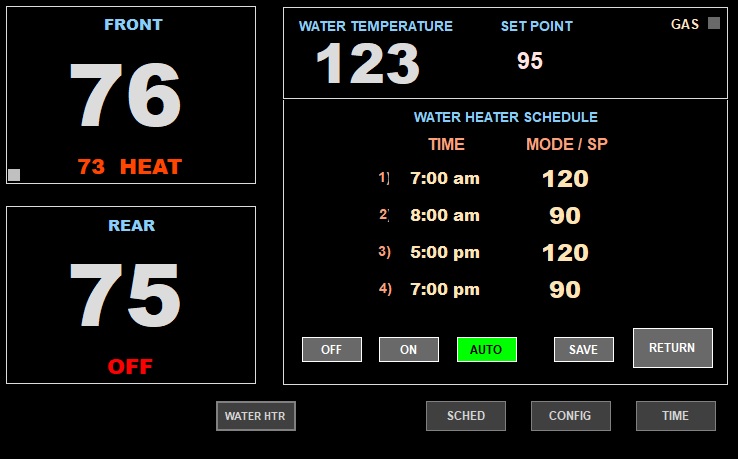
WATER HEATER – Control a standard Atwood water heater. Three modes, OFF, 140, AUTO. In the 140 mode,Waiter ECC just turns control back to the Atwood OEM controls. These are normally set at 140 degrees. In the AUTO mode, Waiter ECC controls the water heater. You can set the set point between 85 – 135 degrees. Schedule, there are four lines for scheduling set points and modes at different times of the day.
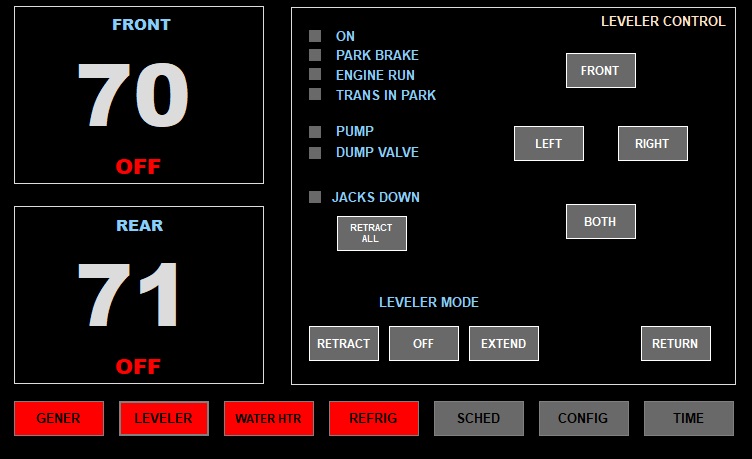
 LEVELERS – Control an existing Power Gear hydraulic leveling system. The Waiter Leveler control module replaces the PG control module. You can control the levelers from the touch screen, OR, the original PG button panel if its compatible. A compatible PG button panel plugs into the new controller module in the exact same fashion that it plugs into the current PG module. The touch screen provides feedback as to the system status. The system allows the operator to “RETRACT ALL” levelers exactly the way the standard system works now, AND, BIG FEATURE, the operator can raise individual by any amount. You select the leg you want to move, then use the UP or DOWN buttons to move it. There are currently no plans to create an “AUTOMATIC LEVELING” mode, however, this could change.
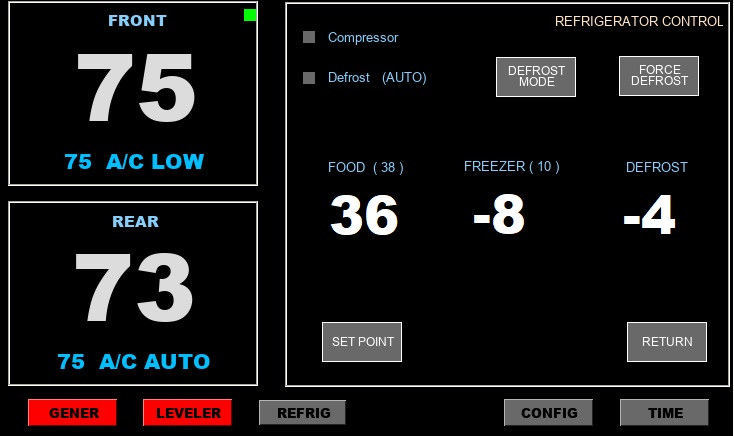
RESIDENTIAL REFRIGERATOR – This module controls the compressor, defrost, and set points for a residential refrigerator. This may sound redundant from what a standard refrigerator does, but the biggest feature is the ability to override the defrost modes. This is especially meaningful when boondocking and the refrigerator is running on batteries/inverter. By disabling the defrost mode, this can greatly extend battery life.
If you’re having difficulties with your Intellitec system, explore the various options,. consider the cost of repairing vs replacing it with a Waiter ECC.
I want to put in a plug for this. I installed the WaiterECC in my Southwind and it is a massive improvement over the Intelitec unit. I also installed the remote screen. It will be great to have the controls up front. I really look forward to the generator and leveler controls. Those additions really make this a complete control unit. Thanks John for putting this together. Us guys with older motor homes need guys like you to keep them running! I have learned a lot from your site.
Thank you Jeff..
You could do me a big favor by creating a new thread on sites like irv2 and post what you said, plus a link to the site. irv2 moderators have deleted several of my posts where I’ve attempted to help people with this problem. They say its against forum rules for me to post anything about something I am selling.
John,
They deleted my posts about it too. They said I was soliciting. I explained that I was recommending a product that works for me and that I do not get any kick backs or money from you. They do have some weird rules about a member selling a product on their site. Do you have to register as a vendor?
They told me in order for me to even respond to any quires related to the subject that I must be a sponsor. If someone is having a problem with their existing system, I’m not allowed to respond post, or communicate with anybody regarding this subject. I checked into it and their rates start at $350 per month. I recommended that they offer some type of click-through or a commission rate, but they didn’t want to talk about that.
I monitor the traffic to my site, the vast majority comes from Google search and Facebook. only about 2% comes from irv2.
Thanks anyway. If you see anyone who may be able to use it, send them a PM.
Looks great. Is it compatible with Shed system?
(2000 Bounder)
Yes, its comparable. AND it also does whats called a pre-SHED. It looks to see if amps are available before even starting the compressor. If the amps ar not available, it waits until they are before starting the compressor.
I wish I had run into you two years ago when I sent mine to Itelleitec in Ohio and spent way too much money to have mine repaired. I live in Canada, so customs and shipping added greatly to the cost. It was doing the same things as yours and it bothered me, thinking about a possible fire. I also would shut off all power when not using the Bounder. I searched all over to buy used and none available that I could find. I must say that Intellitec repaired it and it works just fine.
Jim
I can’t afford the Walterecc but I’d like to change my system to digital. I have same old system as yours. Can I hook up two thermostats one for front and one foot back ac? Another question, does the climate control module under frig connect to any roof ac? Just purchased 2 dometric brisk 2 for front and rear. Hope they can be run by that unit.
Talked to you before..love site
Mike baker
Homosassa, fl
Yes, No, Maybe:
Is it possible to hook up a standard ole wall home thermostat to run the furnace and A/C system. Yes, but it will require designing switches/relays to provide the conversion from a standard ole home thermostat to the proper control signals required to control the RV systems. You’d lose the current monitoring / shedding function that the Intellitec ECC (or Waiter ECC) do to reduce the risk of overloading your 30 amp circuits.
On my RV, the Intellitec control module under the frig is what controlled the furnaces and A/C units. Yours may be similar.
I can’t remember how I found your site, buy it is great. I bought the Waiter ECC immediately after reading this. I jumped at the remote unit and I’m glad I did. Overall one of ths better upgrades we’ve made to our 99 Pace Arrow.
The only minor change I would make is in the GUI. Maybe a couple style optiona to pick from? Round buttons/background colors/etc. I know thats a pain. Also addition of a permanent “return to default time display” button (unless I’m missing it? ).
Adding the accurate external sensor to calibrate is genius and very useful. Tricky to pick a good mounting location though. I tried the suggested one near my propane tank but it runs about 10deg hot.
It is nice info as I never thought of replacing Intellitec dual thermostat ECC with Waiter ECC thermostat but thanks to you for sharing your ideas with us.
The Waiter ECC is a great addition to my 2000 Bounder. After I installed it the 30 amp power went out. John suggested I look at the ACO (Automatic Change Over) write up he had on his web page. He was dead on it. My ACO was burnt up. I bypassed it so I could take a trip. Thank you for the call John.
J’aimerais savoir si je peut remplacer mon. Thermostat electronic climate control by intelligence 00-00597-100 mercière
Yes, If you wish to replace the unit, you can look at all the options on the web site
http://www.waiterecc.com
My leveling jacks don’t work anymore
1999 Southwind 32v: The air conditioners were working well.
I disconnected shore power and started the generator and both ran like they should. I removed the load and shut down the generator.
When I connected back to shore power, the front a/c ran normally from the the ECC, however, the back a/c compressor would not come on (the fan worked from the ECC but the thermostat control would not turn on the ac compressor). I used the intellitec control module (under the fridge) to switch to manual rear ac operation and the compressor came on, the front ac was on thermostat control and stayed on. The rear thermostat still does not work and the compressor works in manual. Why? Do I need to reset a circuit. Should I have left the generator running when I connected shore power and let it automatically switch to shore and then shut off the generator? Any thoughts appreciated.
Check the temperature sensors, There are plugged into the back of the wall control unit, should read 8k to 12k. there is a chart in the DOWNLOADs section that give you the exact OHMs readings for specific temperatures.
How do we know if the Intellec Thermostat is what is failed? What could be some of the signs that the thermostat is the issue?
A/C or furnace running, even though they are turned off.
Thank you. Not sure that I have similar issues. Yesterday, I turned off both circuit breakers on my generator and the thermostat problem with running both a/c units was corrected. I don’t understand…but I will take it.
I have a 2001 Fleetwood Expedition Class A. I am needing to replace the front AC. Looking at using the Furion Chill Cube. From what I can find the Intellitect ECC is not compatible. Does anyone know if the Walterecc is compatible with the Furion? I RV also is a 30 amp system show it uses load shed. Thanks