
Since we bought our Southwind two years ago, both furnaces would let out a short, but not to loud, screech when they first started. From previous experience, I knew the blower motor’s days were probably numbered.
Fast forward to today, its been cool at nights, so I’d leave the furnaces set at 60. For the past couple weeks, they would cycle a couple times during the night. THEN, last night, at about 3 a.m. the rear furnace let out a continuous squeal for about 30 seconds until the flame started.. We shut that furnace down so we could get some sleep. In the morning, I decided it was time to replaces the blower motors in both furnaces. I started my search for new motors.
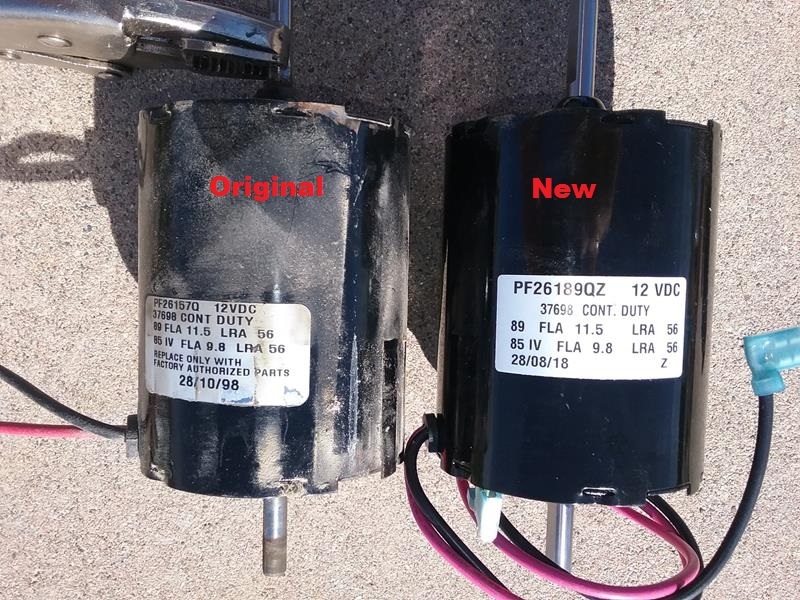
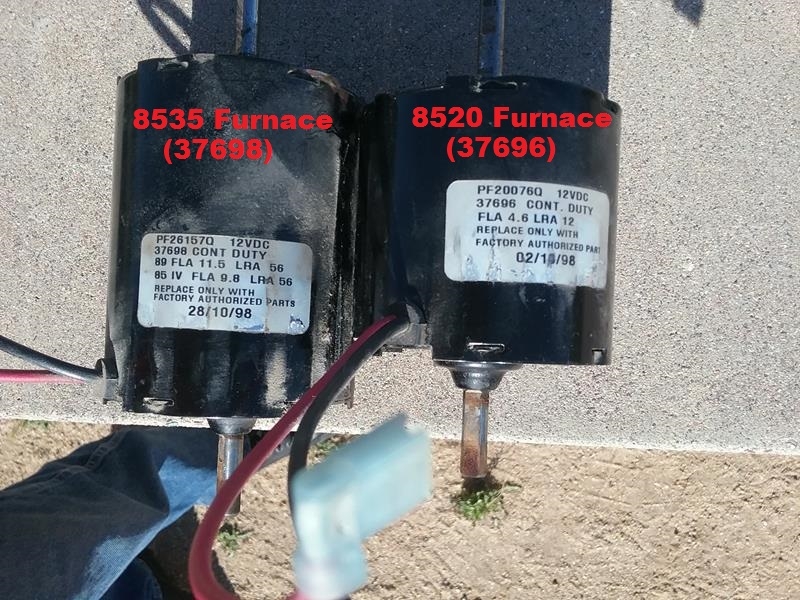
I found both motors for a good price at Adventure RV. I have an Atwood 8535 furnace in the front that uses a 37698 motor for $52.33, and a Atwood 8520 furnace in the back that uses a 37696 motor for $46.99.
REMOVING THE MOTOR
This project went fairly quick, a little over an hour. The only special tool needed was a long 1/8 inch Allen wrench used for the squirrel cage blowers that mount on the shaft. Take photos as you progress. These will become invaluable when re-assembling and not exactly sure how something fit.
1) Set the thermostats to OFF so there won’t be a call for heat.
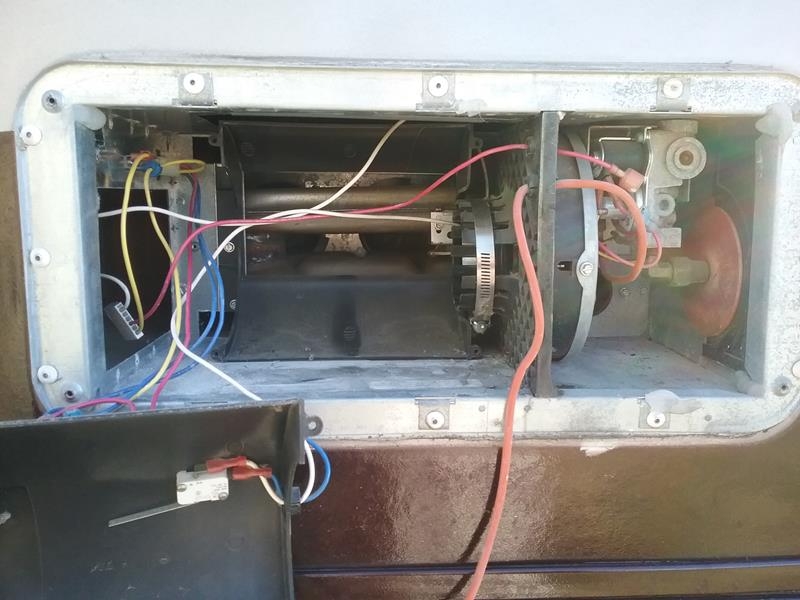
2) Remove the cover, turn the power switch to OFF.
3) Unplug the control board and remove the igniter wire from the control board. Remove the wingnut and the control board will slide out.
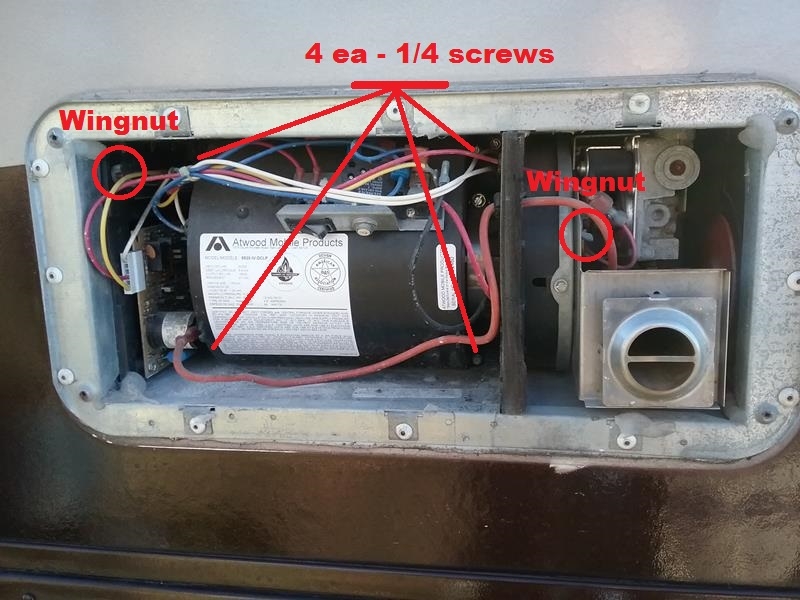 4) Remove the wingnut and washer from the exhaust tube. Remove the exhaust tube. This may take a little prying and wiggling, but it should come straight out.
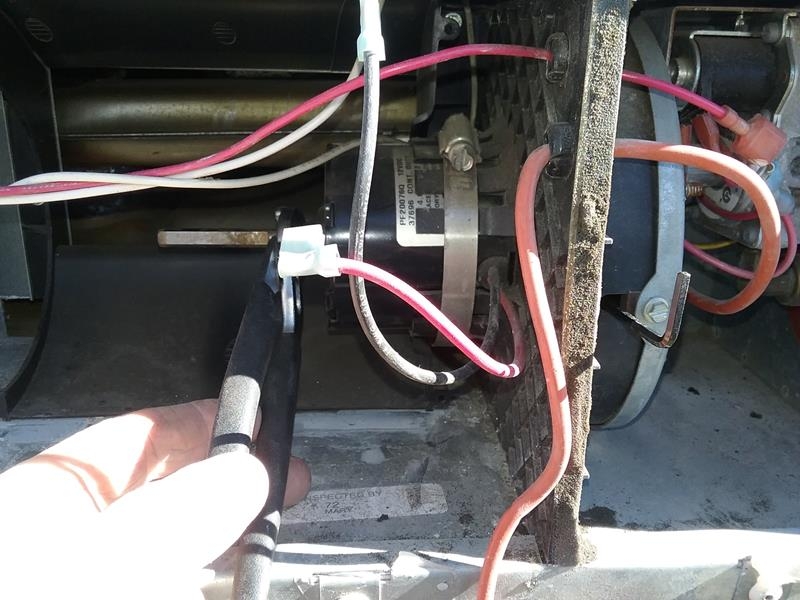
5) Remove the blower squirrel cage cover, its held in place by 4 1/4 inch hex screws. Cut the wire ties, disconnect the two motor wires(red and black). The cover is a tight fit so will need a little bit of wiggling to get it out of the way.
NOTE – A round air inlet guide will probably fall off from the left side as you loosen the cover. It just clips in place.
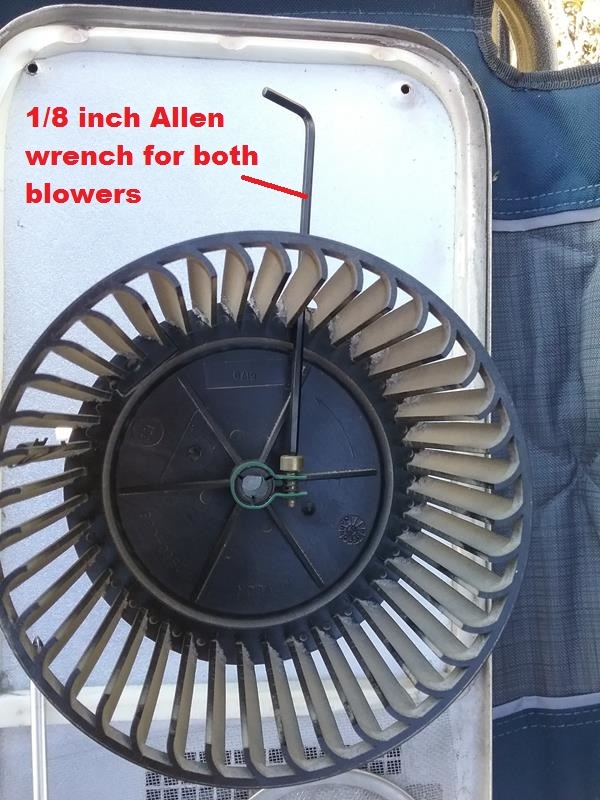 6) Using a 1/8 inch long Allen wrench, reach through the hole in the fresh air blower and loosen the Allen screw a couple turns. The fresh air blower should now slide off.
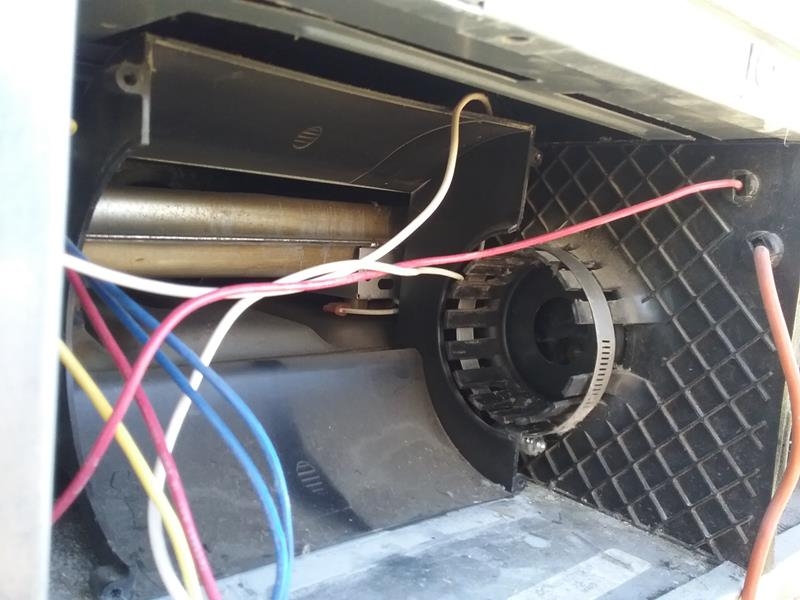
7) Loosen the 5/16 worm clamp that clamps the motor to the mount. Slide the worm clamp off the motor.
NOTE – The small metal security bracket that lays against the motor will fall off when you remove the clamp.
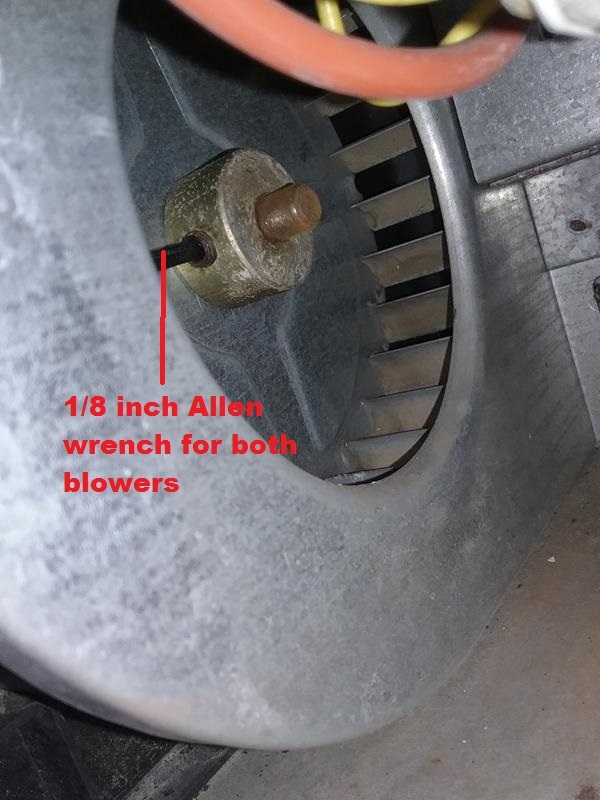 8) Using the 1/8 inch Allen wrench, reach through the small hole on the exhaust blower housing and loosen the set screw on the combustion air blower collar.
HINT – getting the squirrel cage off the motor shaft may be difficult. I used a piece of 200 sand paper and cleaned some of the rust off the protruding shaft. I then re-inserted the Allen wrench through the hole and back into the set screw on the squirrel cage. Spray a little PB blaster on the shaft, and up into the flat part of the shaft.
 Pull the motor to the left as your doing this. Use a set of pliers on the motor shaft on the fresh air side to rotate the shaft. The Allen wrench should prevent the exhaust blower from moving and allow the shaft to rotate inside the exhaust blower to break it free.
Spray PB blaster as you rotate the shaft, I would rotate a little as I pulled, then push the squirrel cage back onto the shaft as far as it would go. A couple times of this rotate, pull, spray, push back on, and the motor finally slide out of the squirrel cage and came out.
NOTE – When the motor finally comes out, you should have the metal security bracket and also a rubber shaft seal..
INSTALLING NEW MOTOR
This is just the opposite of the removal process, but here are a couple helpful points.
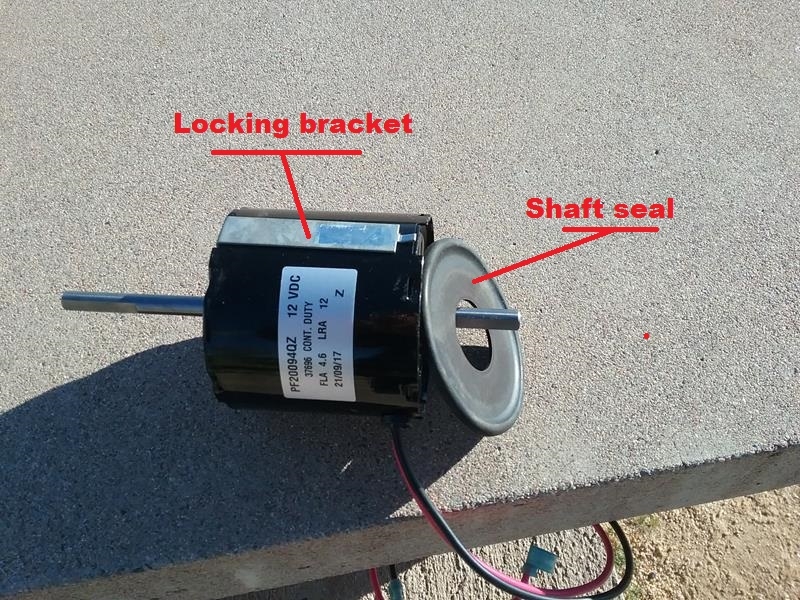 1) When sliding the new motor into the unit, verify that the rubber seal is on the end of the motor and the lip on the seal points toward the exhaust blower. You’ll need to align the exhaust blower with the motor shaft as you push the motor into the mount clamp. We’ll tighten it in a moment.
2) The small security bracket. The small protruding end goes in between the tabs (fingers) on the mount clamp. The large end that has the 90 degree bend should fit into the indentation on the end of the motor. Look carefully at your old motor and you’ll see how this works.
3) Slide the work clamp over the motor and onto the mounting bracket. Before tightening, verify the motor is fully seated and all the way in the bracket. Verify the security clamp is fully seated, and the 90 degree is in the indentation. Wiggle the motor to make sure its snug. Verify no wires are caught in the clamp or mount. Snug the worm clamp.
4) Centering the exhaust blower in the housing –
a) 8520 – This had a plastic blower that used a clamp to secure the blower on the shaft. The blower had a flat spot that lined up with the flat spot on the shaft.
b) 8535 This had a metal blower that had a collar and set screw to secure it to the shaft. Line up the flat spot on the shaft with the Allen set screw in the collar.. Snug the set screw, rotate the shaft a tiny back and forth while snugging the set screw. This will align the set screw perfectly with the flat spot on the shaft.
NOTE –
This will take a little guess work and some trial and error.
Push the blower as far against the motor as it will go, then observe the clearance between the blower and the housing, Pull the blower away from the motor about 1/8 – 3/16 inch snug up the collar. Rotate the shaft by hand to verify the blower is hitting the housing. Once your happ, tighten the collar to secure the blower on the shaft.
5) Install the fresh air blower. Slide it all the way onto the shaft so it hits the motor, then pull it back away from the motor about 1/8 inch. Stand back and you should see that the blower is about centered in the housing. Spin the blower and verify it isn’t hitting anything, tighten the collar.
6) Intake air guide. When installing the outside fresh air blower cover, it may be easier to slide the end guide into place and get the little tabs inserted as you install the outside cover.
7) Plug motor wires into the control relay. The black wire will go to the right side. Red wire to the bottom terminal.
8) Spray some silicon spray on the end of the exhaust tube. Slide the tube into the furnace and secure it with the washer and the wingnut.
9) QUICK TEST – Before closing up, do a quick test to make sure blowers aren’t hitting anything.
Verify the ON/OFF switch on the furnace is OFF. Go inside and set the temperature to high and turn the furnace ON.
Go outside and turn the furnace switch to ON. After a few seconds, the blower should start. after about 15 seconds, the burner will ignite. When satisfied, go inside and turn the furnace off. It The blower will continue to run for about 10 seconds after the gas has been shut off.
10) When satisfied, use wire ties to secure the wire bundles.
11) use Silicon sealant, place a big glob on the bottom of the control board to keep it from vibrating. I also ran a bead around the edges and in the center divider to seal the cover when I put it on.
12) Install the cover, re-verify the operation.
Great tutorial. Hope I never have to reference it.
Russ 1999 Dutchstar.✅
Just did this tonight, read the post like a year ago and then turned furnace on tonight and que pig squeal. BIG help!
Thank you!!!
Bob