
UPDATE – Apr 2019 – I re-did the CHF on the rear and installed longer links, READ HERE. Note that the length of front and rear links may be different. Link length also varies with the different F53 chassis. Read both articles.
Cheap Handling Fix (CHF) is probably one of the least know adjustments that vastly improves the handling of the Ford F53 chassis. I was first introduced to the CHF when I owned my 2001 MIrada. It was a white knuckle adventure to drive, especially in cross winds or when passing or being passed by large vehicles. I asked if there was anything I could do to improve the handling of my old Mirada. Among the thousand dollar aftermarket bars, shocks, and other hardware that promised to improve handling was this thing call “Cheap Handling Fix”. The price was right, FREE, and it made sense, tighten up the torsion bar and this should improve sway.
WOW – What a difference, handling was vastly improved by making this one simple change to the suspension.
What is CHF? Basically the front and rear torsion bars on the F53 come from the factory with the connector links mounted in the forward, or loose position. When the side of the vehicle is lifted or pushed against, such as a wind gust, the link on one side tries to lift the torsion bar, but the link on the other side is trying to keep the torsion bar straight, this lifting is converted to a “twisting” motion of the torsion bar. The “twist” transfers to the other side of the bar and tries to push / pull on the frame in an attempt to keep the frame of the vehicle parallel to the axle, thus reducing tilt, and sway.
The CHF adjustment moves the frame to torsion bar link connection to the rearward adjustment hole on the torsion bar. With the new setting, the same amount of sideways “lifting” on one side now causes the torsion bar to twist a lot more. This additional twisting applies even more force to the other side of the torsion bar and helps keep the frame parallel to the axle, thus less sway..
The front CHF is a little more complicated than the rear. If the link is attached to the torsion bar with “Z” brackets, when you move the link to the rear hole, you will not be able to re-use the “Z” links because the link will hit the “Z” bracket, bending the link.
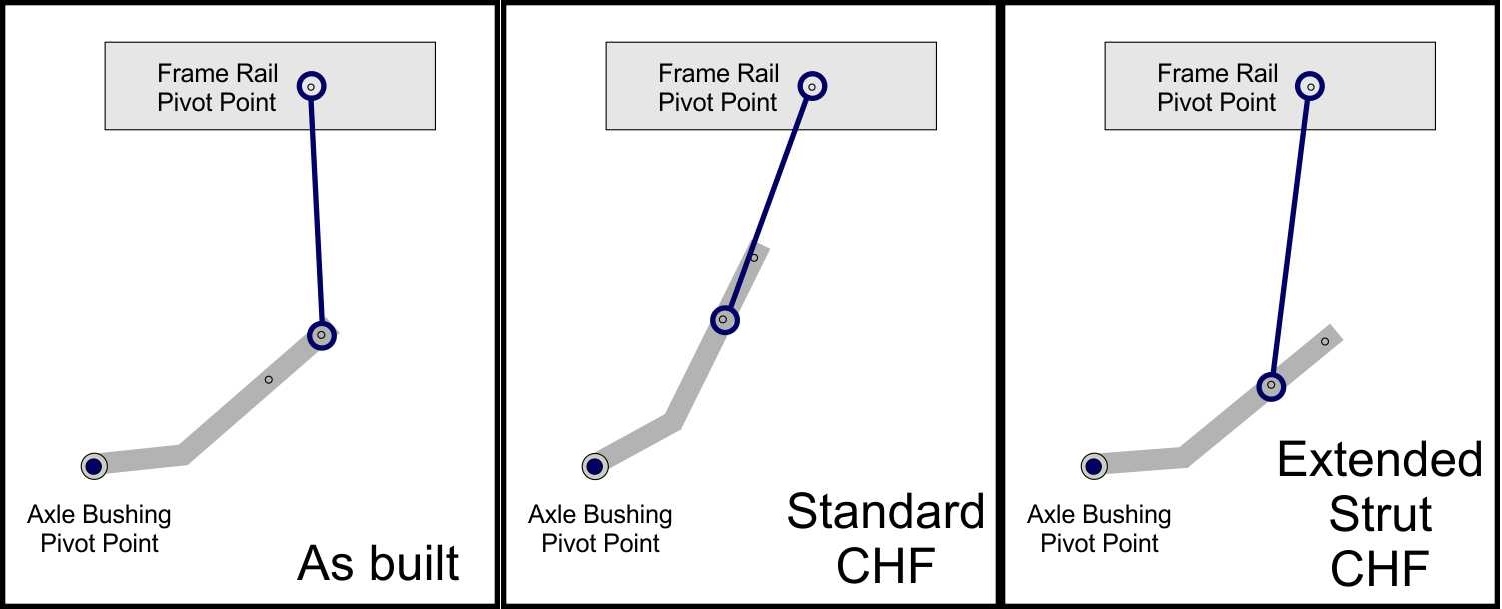
An additional option to the standard CHF is to make the front links longer. The longer links help improve the geometry forces when the links push/pull against the torsion bar. Making the links longer is fairly easy to do, and will require access to a welder. (see below). The above drawings are scaled correctly to the lengths and pivot points.
The only tools you’ll need are 15mm and 18 mm sockets and wrenches. You may need a bottle jack to put a small amount of force on one side of an axle if the torsion links don’t want to line up.
FRONT CHF
Remove the links from the chassis. To get the top bolt out, you’ll need to loosen (not remove) the top “Z” bracket.
Completely remove both bolts on the bottom. You may not be able to physically remove the bottom link bolts (they will hit the leaf spring) until you remove the top bolts and then swing the torsion bar down.
Regardless if you make the links longer or not, when you reassemble, you will NOT be able to re-use the “Z” brackets on the bottom. Not a big deal, Make sure to install the washers next to the rubber bushings.
Making the front links longer.
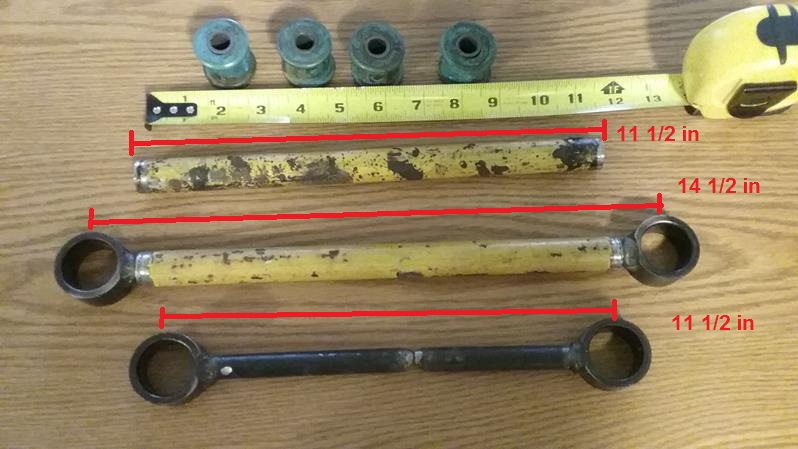
The standard links are about 11 1/2 inches (hole to hole). I extended the links so they are 14 1/2 inches center to center.

- To remove the rubber bushings from the links, I put a little oil on them, then slowly pressed them out.
- Cut the link in half.
- Using a 1/2 inch water pipe, cut it to 11 1/2 inches. ( I used a 10 inch pipe on my Mirada and wish I had made it a little linger, This is where the 11 1/2 inch came from)
- Slide the links into the water pipe, then weld the pipe to the links.
- Reinsert the bushings into the links. – You now have links that are 14 1/2 inch center to center.
REAR CHF
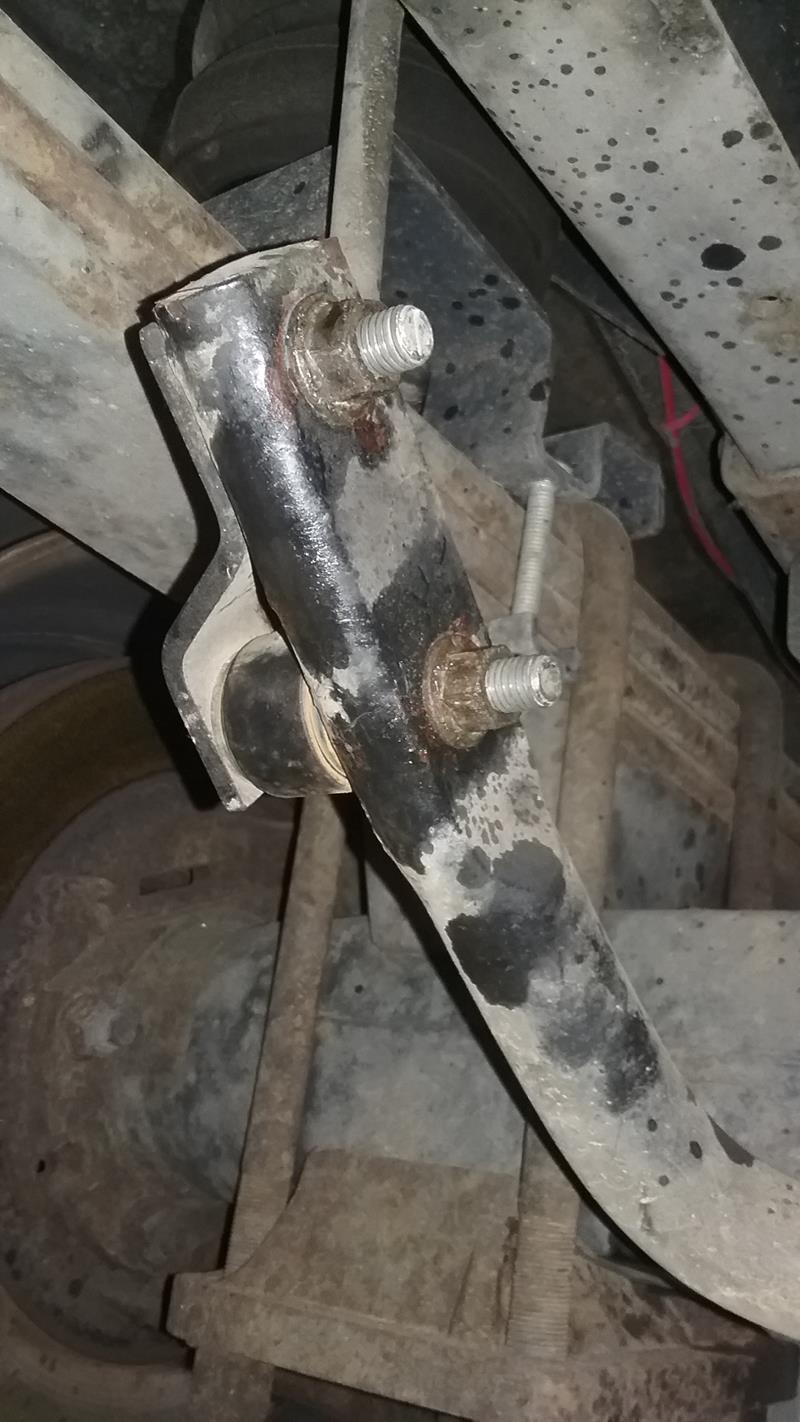
The rear CHF is easy. You don’t need to remove or even loosen the top bolts. Remove the two lower nuts from the bolts on both sides. The bolt that goes through the link is pressed into the “Z” bracket (part of the “Z” bracket). When you move the link to the rear hole, you’ll need to flip the “Z” bracket over.
If you have problems getting the holes to line up, you can jack one side of the axle a little bit I used the leveling jacks to raise one side a tiny bit. You could also loosen the torsion bar to axle bushing bolts.
IMPORTANT – Ford changed the rear axle torsion bar brackets around 2005. The new bracket is kind of wimpy, AND, it has a nasty habit of the bolts loosening up and falling out. Consider using blue locktite on these bolts and torque them to 65 ft lbs.
Can you tell a noticeable improvement in the CHF with the air bags… we have air bag helpers front and rear on our MH… have not done the CHF on the rear yet… I couldn’t really tell a difference after doing the CHF on the front, but we already had the rear air bags installed at the time…
Yes. CHF makes a difference. the ride is more solid, especially in crosswinds. Do the CHF on the rear also.
How old is your chassis??
It’s a 1999 20,500 lb chassis and a 35′ MH… living room slide on drivers idea and bedroom slide on passenger side… Georgie Boy Cruise Master 3501…I’ve been running 90psi in the rear bags and 35 psi in the front… I’ll have to double check but I think my front weighs a little over 6,000lbs…
Sounds like the same year and chassis as mine.
My empty weights are FRONT = 5,840 and REAR = 11,000
Do you have airbags front and rear? What pressures do you run in the airbags…
Pingback: Shakedown Cruise – 1999 Southwind 35S
Pingback: Improve the handling of F53 – 1999 Southwind 35S
Pingback: F53 – Homemade rear track bar – 1999 Southwind 35S
I just bought a 2000 Fleetwood Flair32v and would like to do the CHF do i need longer sway links to do this or can I use existing links and if I need replacements do you know part numbers
I read post and see mef66 as a part number is this for just rear I attempted to do this and the originals seem to short for the front I did not unhook top of link when I attempted it and had problems getting bottom bolt out
Yes, you can use the originals.
thanks for the reply
I just read this article and it sounds like a big help to the handling.
I have a 98 HR Endeavor and it drives like a tank Any improvement will be a great help. This is the first article I have read about this and it seems you really know your stuff. Starting in the morning on mine. Directions are very clear and hope this helps. The way it is, makes it a nightmare on a long trip. Thanks for sharing your knowledge to an old Ky. farm boy.
One other thing, My HR has a tag axle. Are there any improvements I need to make to it? Also do you know how to adjust the electric brake on the tag axle? When I first got the motorhome, I thought that was the brake for the trailer brakes, so I have it all out of adjustment. It either it comes in too much or not enough.
Pingback: Improve handling of F53 chassis - 1999 Southwind 35S
Is the CHF possible if we have a Safe T plus steering stabilizer on the front suspension?
Also, is the CHF ok to be done on the rear suspension with the above mentioned addition?
It should be ok to do both front and rear.
I did the CHF adjustment on the front and rear and it has made a big difference in how my 2018 29M handles.
I just read your article I found adjustable extended end links11” to 14” and 14” to 17” screw adjustments for 2000 south wind storm 30h from SD truck springs model 7962 by Hellwig $112. ($30 more for longer version)For the pair, plus tax, free shipping