
REPORT UPDATE – APRIL 6, 2019
The pump started making noise again.. The screeching was so loud, when I lowered the levelers, the entire campground thought something was going to blow up. It sounded like the pump motor armature was wobbling and binding inside. Looks like the motor is bad…
Two years ago, the motor cost $230, that’s why I tore the old one apart to repair it. When I checked Amazon a couple weeks ago the price came down significantly, $130, so I ordered one and replaced it. If you’re going to replace the motor, more than likely, you’ll also need to replace the front bearing, The new motor comes with a new front bearing. I replaced the failed front bearing two years ago, its lightly pressed in and I couldn’t get it to pop out. It looked as good as the day I installed it so I decided not to use the new bearing that came with the motor.
NOTE – The motor shaft is lightly pressed into the front bearing. I removed the new bearing off of the motor shaft. When I installed the motor, I lined up the motor shaft key with the pump shaft key and snugged the two motor bolts down. I took the motor end cap off, and lightly tapped the end of the motor shaft with a small mallet to drive the shaft down into the bearing. I could see the shaft move down approximately 1/8 of an inch. I suspect you may also need to do this even if you’re able to use the new bearing. The tapping will drive the new bearing into the its seat.
If your old front bearing is bad and there’s a lot of corrosion and debris, you may need to disassemble the the entire tank, pump, motor assembly to clean it up and removed the old bearing. This is how I did it two years ago when I replaced the bearing. Read down the article.
IMPORTANT – Water getting in the top of the motor is whats killing it. When replacing or servicing the motor, run a bead of silicon sealant around the small top bearing cover. This will prevent water from seeping in.
An electric driven hydraulic pump should sound like a high pitch whining noise. This pump sounds like someone threw a bunch of marbles in a food blender and turned it on low speed. Kind of a grinding, growling, rattling noise.
Power Gear PN 0500507 pump, valve, and reservoir assembly.
The levelers work fine, everything is normal except the raspy, grindy sound from the pump (motor), It definitely says something is wrong. A google search turned up a couple instances of people with the similar issue, so I decided to remove the pump and tear it apart to see whats wrong. I’m glad I did.
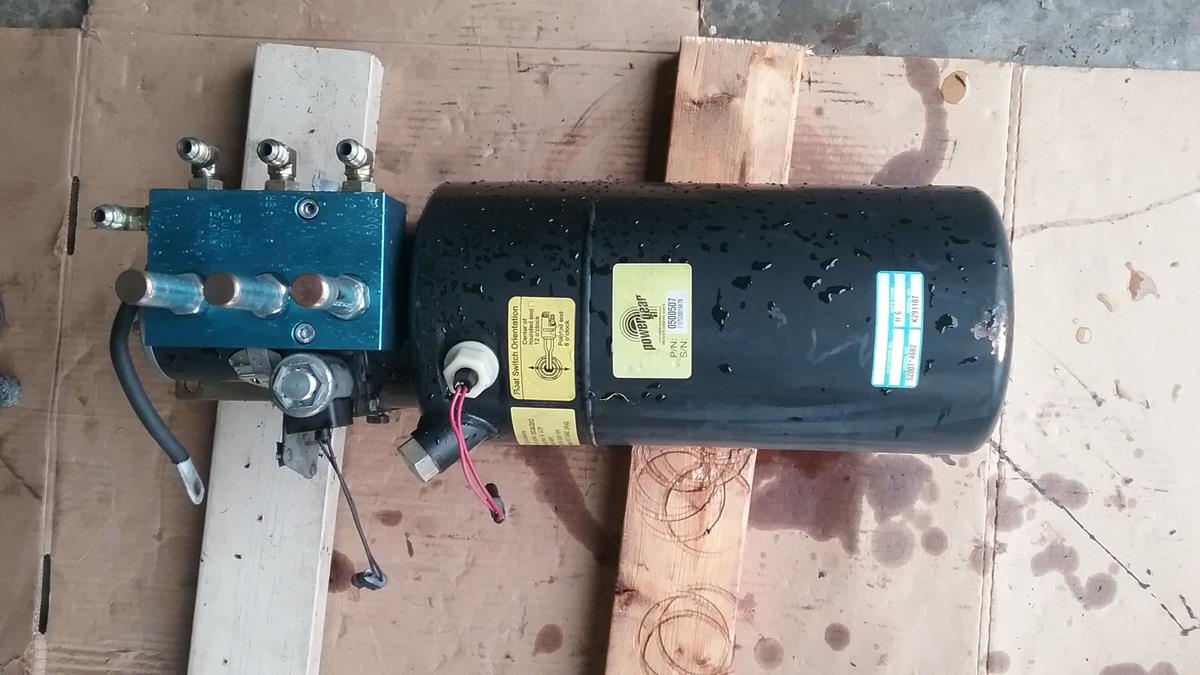 The assembly is laid out like this:
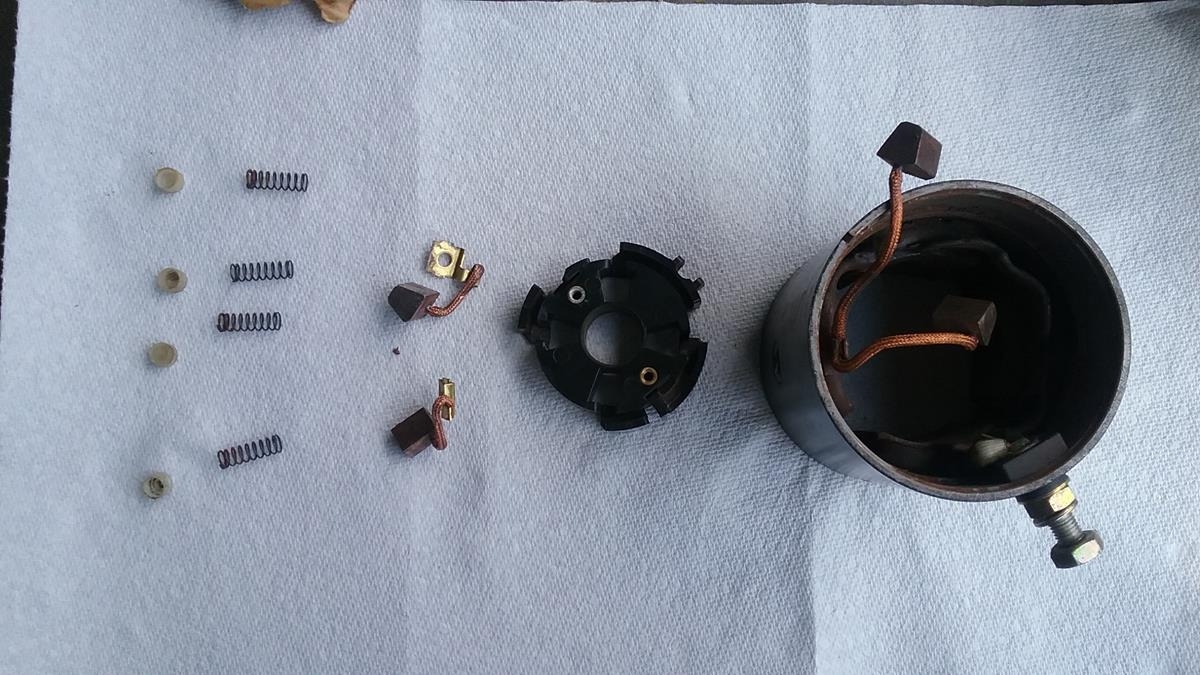
- Electric motor assembly (end cap, brushes, brush springs, housing, armature)
- Motor Front Plate (motor front bearing, pump shaft seal, valve assembly mounted to plate)
- Hydraulic Pump Assembly (hoses into tank)
- Reservoir tank
REMOVING THE PUMP ASSEMBLY
I disconnected the coach battery cables to make sure the pump didn’t have power to it. I then removed the main power cable from the motor solenoid.. I drained the fluid out of the tank, then used masking tape on the four hoses and the four solenoids to mark where they come from. Before removing the hoses or solenoids I took photos of everything.
When removing the solenoids, there is a o-ring on the solenoid nut (knob), don’t lose it. The o-ring acts like a lock washer for the nut that holds the solenoid on the plunger shaft.
With everything marked and disconnect remove the bolts that held the assembly to the motorhome.
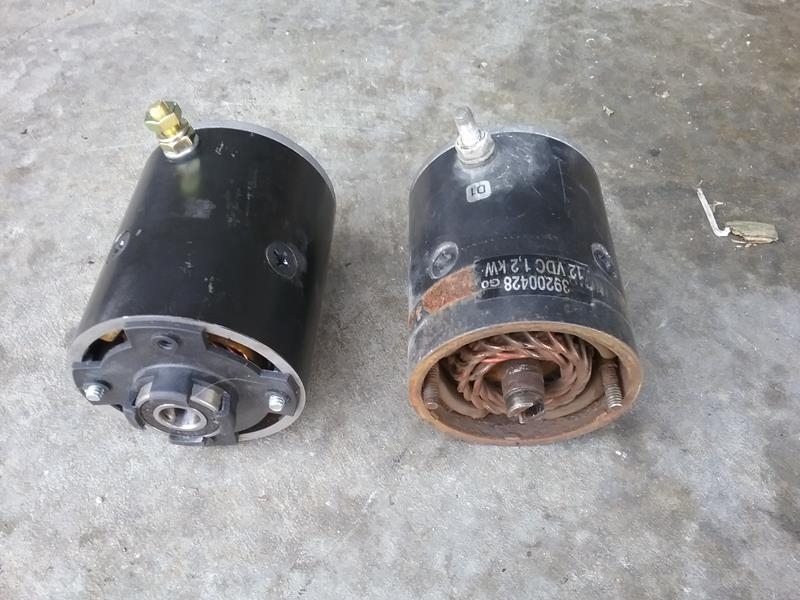
ELECTRIC MOTOR
The inside of the motor was corroded and had a lot of debris and corrosion buildup on the motor front plate. This is what destroyed the front bearing and caused all the rumbling / grinding noise. The rear bushing, on top of the motor looked OK. Looking at the armature, brushes and springs, they look OK after cleaning. If the motor is real bad, Amazon has a replacement.
A new electric motor is available from Amazon, for $230. CLICK HERE. The Amazon motor includes a new front bearing, but not the shaft seal or pump.
MOTOR CONTROL SOLENOID
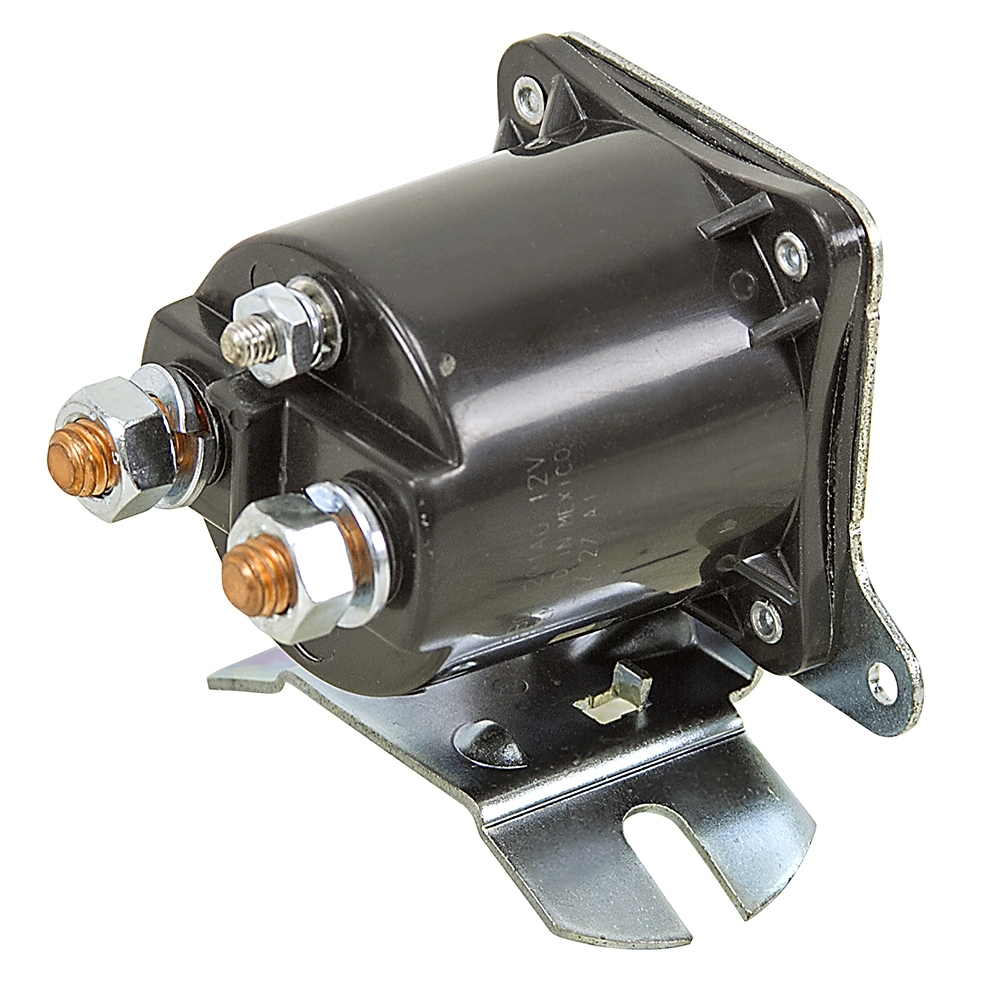 I replaced the solenoid with a new one. The part number is SBC-4201AG. These are readily available and the price is between $20 from Surplus Center to $50 from Amazon.
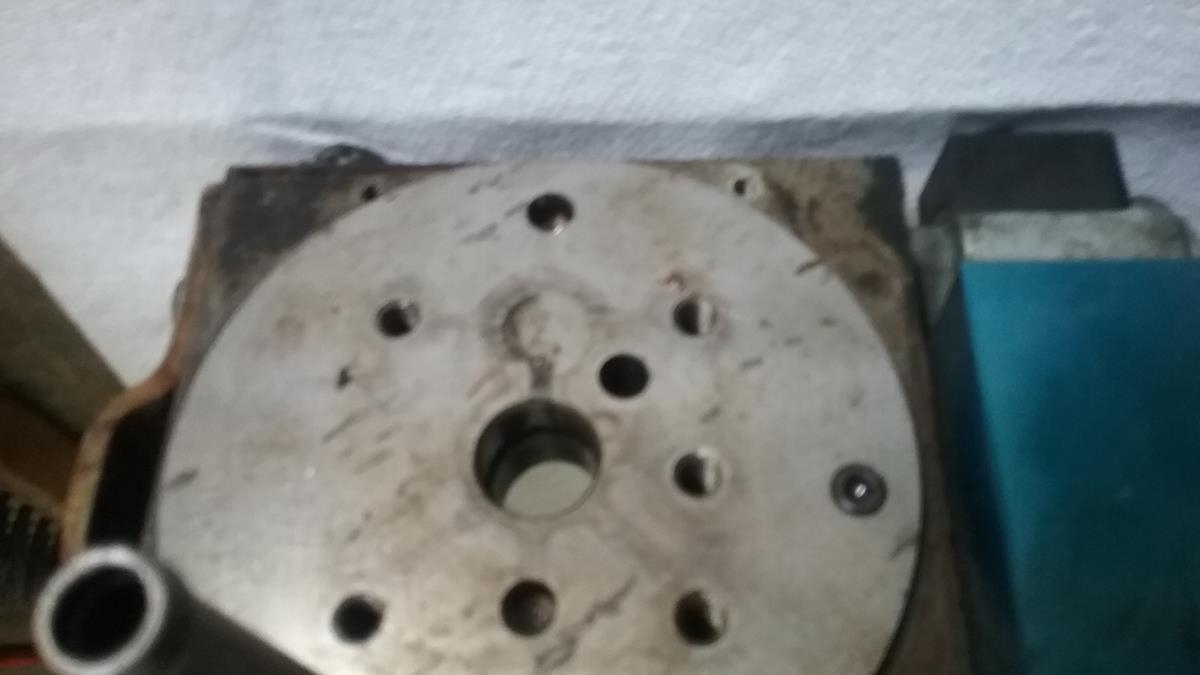
MOTOR FRONT PLATE
Everything mounts to this plate. The electric motor mounts on one end. The hydraulic pump mounts on the other. The valve block assembly mounts on the side, and the tank mounts on the end over the top of the pump
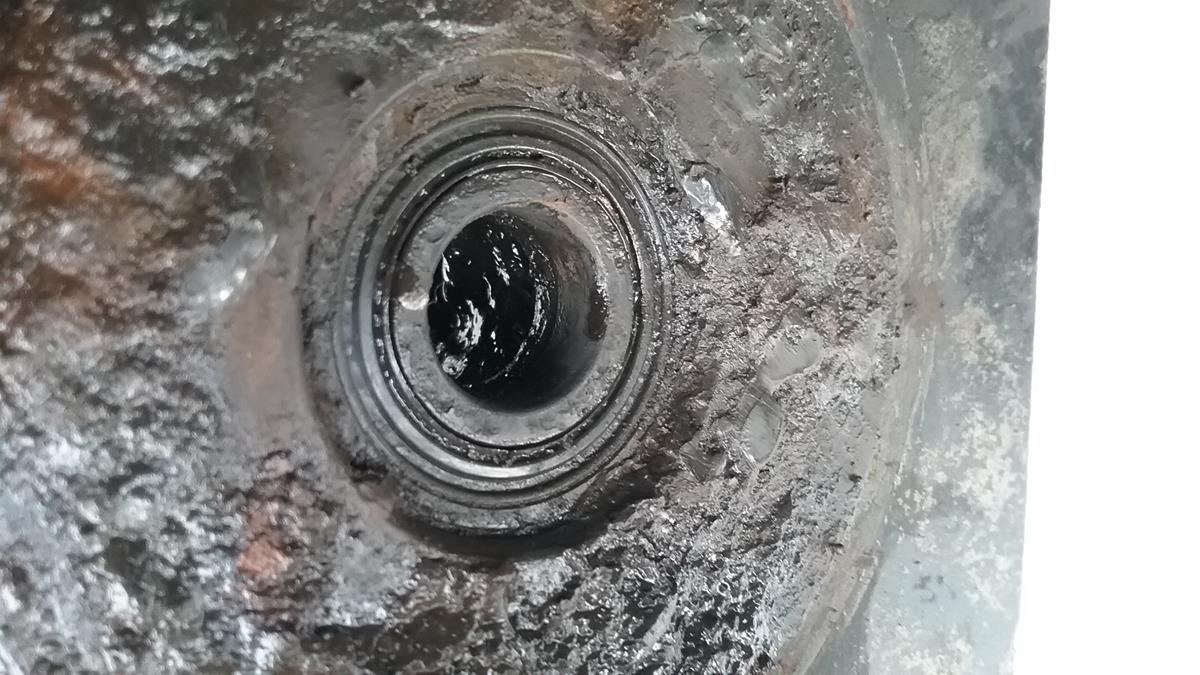
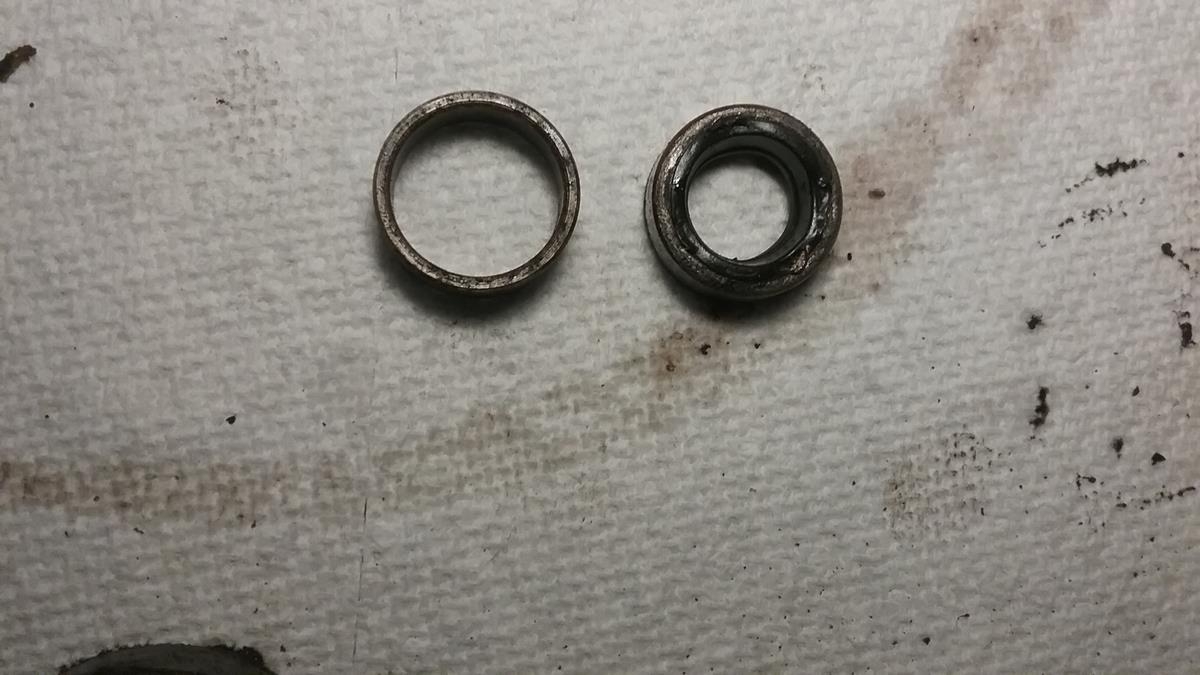
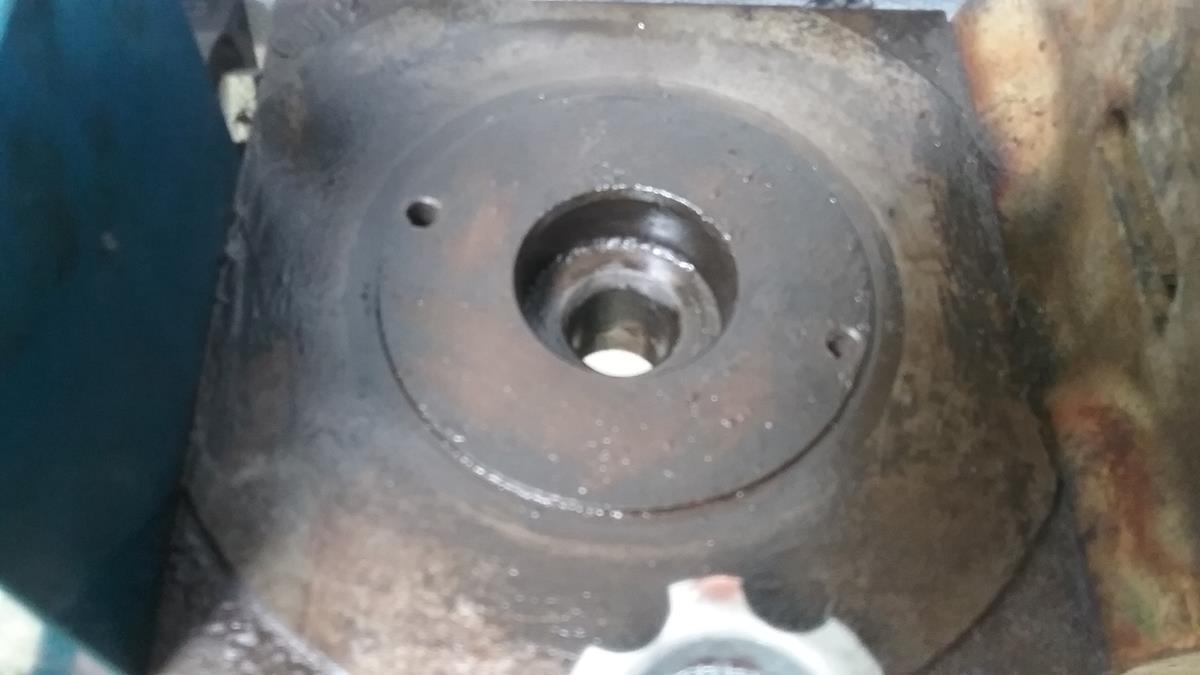
The plate serves as the front face of the electric motor. The electric motors front bearing is pressed into the motor front plate. The bearing can be removed from the front plate using a blind extractor or a small punch and slowly punching it out from the shaft seal side of the plate.
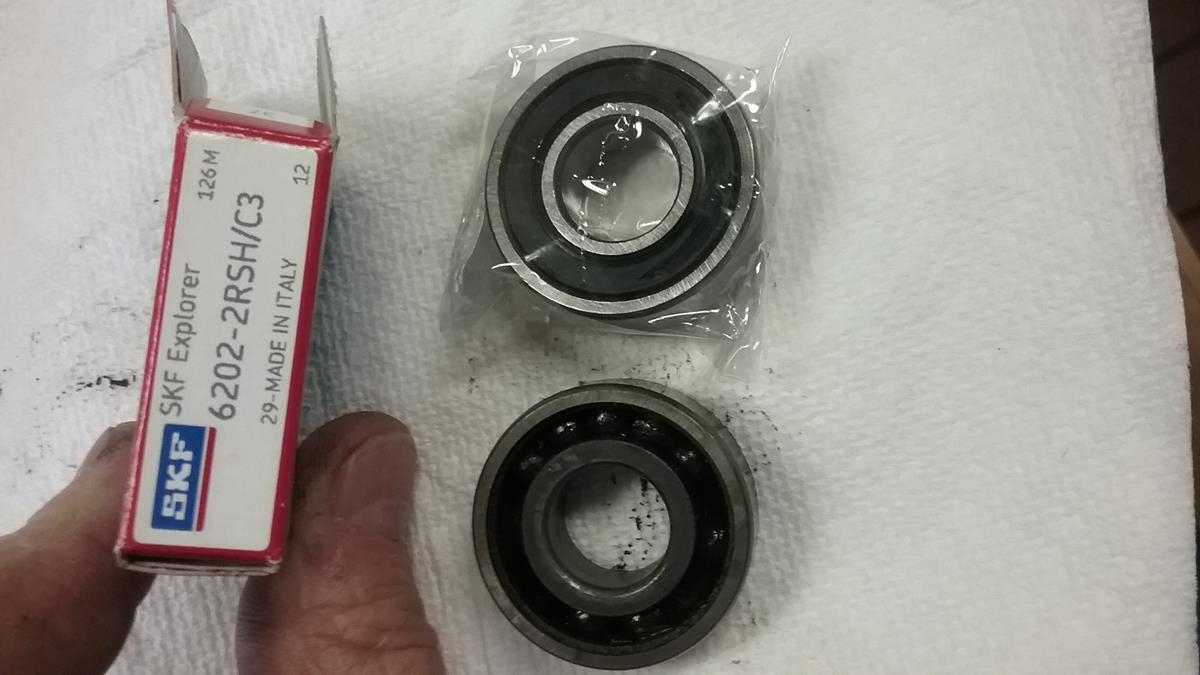
The motor front bearing is a common 6202 bearing. I used SKF 6202-2RSH/C3. This is rated for electric motor service with high temp grease and rubber side seals.
The hydraulic pump shaft seal is pressed into the other side of the plate. This seal is not under any pressure. Its job is to keep any moisture and crap from getting down into the hydraulic pump shaft.
This seal is not a standard part and I wasn’t able to locate an aftermarket seal. (.75 OD x .435 shaft ). Lippert (Power Gear) sells the seal, but they may or may not have it in stock. ($7). The original Power Gear part number ( 030-1071 ) The Lippert number was changed to 359133..
I’d recommend not removing the shaft seal. Clean up the motor forward plate, then look at the seal carefully. If the seal is resilient, leave it alone and re-use it.
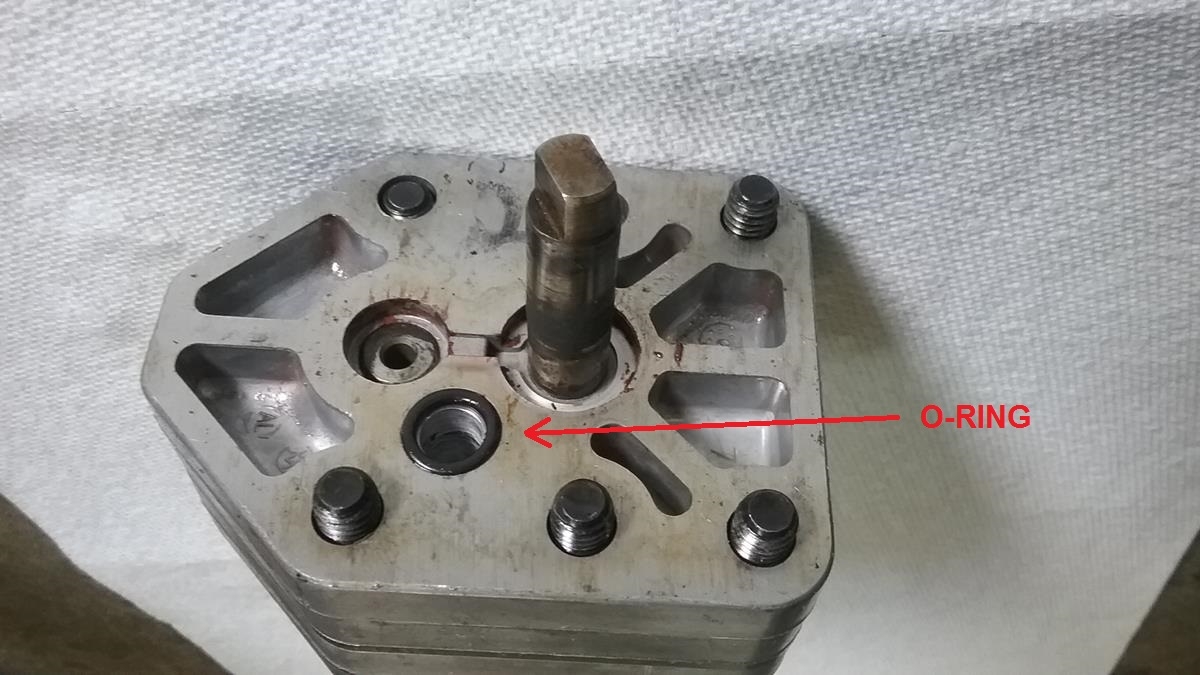
HYDRAULIC PUMP
When removing the pump front the front plate, there is one o-ring. I’d replace that o-ring if you have things disassembled. Its purpose is the seal the pump high pressure that feeds into the end plate assembly.
DISASSEMBLE
The design of the pump motor assembly allows water / moisture to get into the motor. The pump shaft seal does an excellent job of not allowing the moisture to get out. This results in a lot of rust and corrosion inside the motor. This can be so bad that the motor is un-repairable. Mine wasn’t to bad.
Remove four small bolts (5/16) to remove the tank from the motor front plate.
Remove six bolts from the pump. These hold the pump to the motor front plate. You may need to remove one of the hoses so you can get a wrench on the bolts. NOTE there is one o-ring between the pump and the motor front plate.
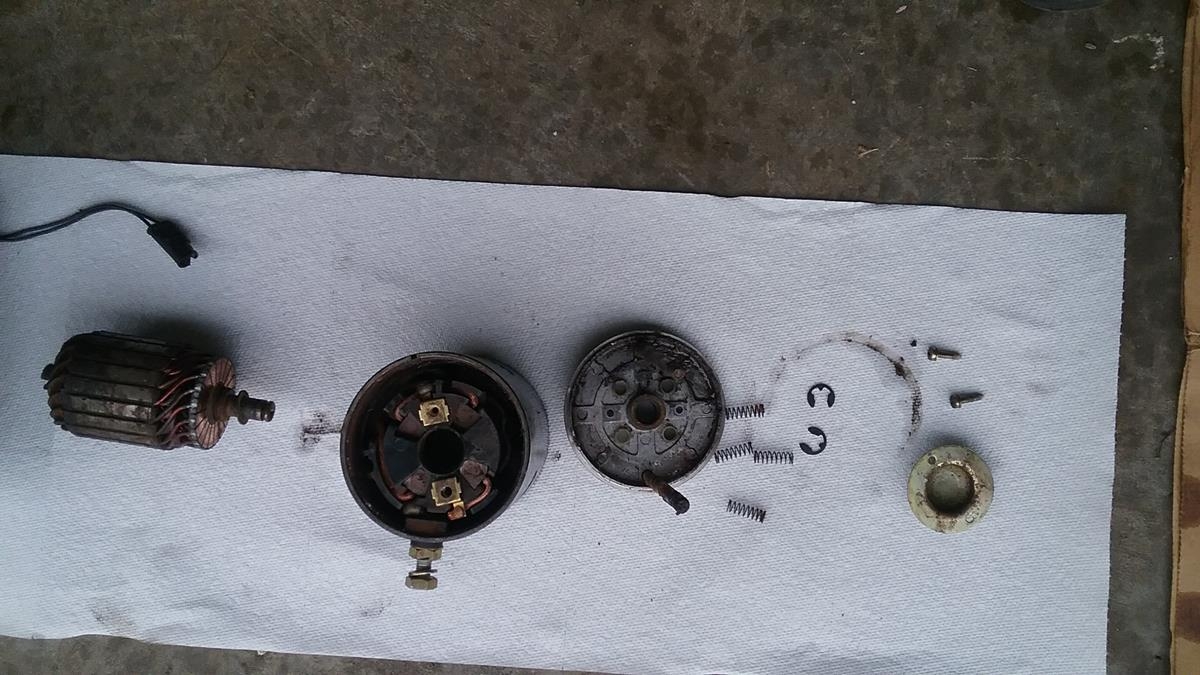
Remove two small screws from the cover that’s on the end of the motor end cap. This exposes the one end of the motor armature.
Remove the two e-clips that hold the armature shaft to the end cap.
Remove the two 2 bolts on the motor end cap. These may be corroded and may not come out. Tap the motor housing lightly to free it from the motor front plate. The motor assembly (End cap, motor housing, armature) should come off of the motor front plate. If the end of the motor shaft is corroded, you may need to use a small punch through the hole where the pump shaft goes, and lightly tap on the motor shaft to free it from the front bearing. When the armature separates from the end cap, watch carefully for the four brush springs. Also, there is one spacer washer on the brush side of the armature
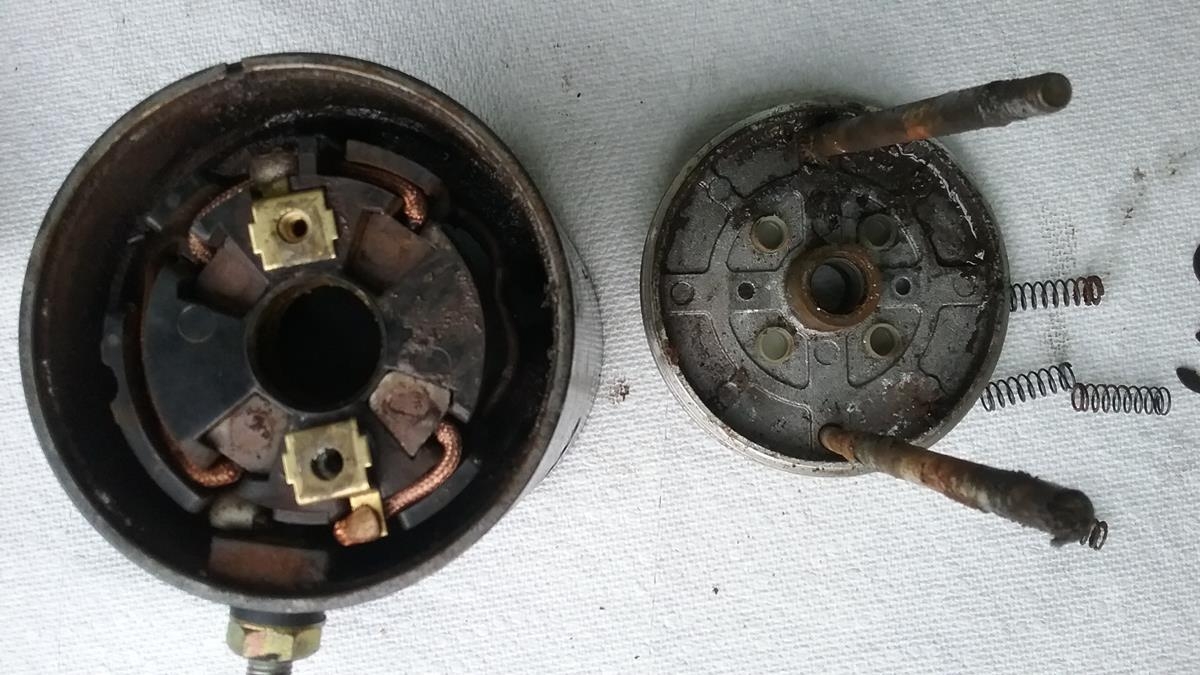
The Motor End Plate should now be free of the pump and the motor. It will most likely have a buildup of crud on it. I cleaned mine up as best I could,
Using a punch or a blind bearing tool, remove the motor front bearing from the motor front plate. Odds are good this bearing is bad and is causing all the noise. A good quality SKF replacement costs about $8
I also removed the shaft seal and spacer washer from the pump side of the motor front plate.. I would not do this again. I’d clean up the motor end plate and inspect the seal. If it looks ok, I wouldn’t remove it
CLEAN AND INSPECT.
REASSEMBLE
Pingback: Flush and refill Leveler hydraulic system – 1999 Southwind 35S
that was the best ‘how to do’ I have ever seen.
I have a 1998 national tradewinds and having trouble with the levelers. Looks like someone cut the pump wires on the control panel and added a rocker switch to the side of the control panel.that now works the pump when pressed. But, when I press the rocker switch I can hear the pump whirl, but touching the arrows on the panel does not do anything on any legs, but holding the pump switch a long time will get the hot motor light to come on. I went out and touched the motoe, it was warm, but no way hot? Any input would be a blessing for me. RUDy
The panel needs to be ON and the parking brake set. I also run the engine..
here is the link to the control panel and system. Mine is on page 14
http://1999southwind.com/DOWNLOAD/PowerGear_Manual.pdf
Thank you for posting all this, like you do. Very well documented!
My pump motor has the “marbles in a blender” issue, also. I am a pretty good DIYer, but have never taken apart hydraulics. Do you know if it would be possible to remove the motor and replace it with the Amazon version without removing the entire unit from the coach? If not, I guess I’ll have to get a couple catch pans and start making a mess. 😉
I would like to know this too. My motor has two bolt stop connect power too. One bolt is wobbly and now smoking. Yikes!
Is it possible to replace motor without removing entire unit? I’m not sure. It may be possible, I never tried.
However, you will also be replacing the front bearing and cleaning the front plate, this may be very difficult to do without removing the entire unit.
Hi there, I just swapped the motor without removing the whole unit. We were unable to get the old bearing out. Although it looked ok 2 hours of work later it still makes the same noise. We will be removing the whole assembly now. I recommend not trying to take short cuts
The first time, I disconnected everything. However, the second time, when I replaced the motor with a new one, I was able to lower the entire assemble down to the ground and replace the motor without disconnecting any of the hydraulics. You will need to replace the bearing. The new motor comes with one. Make sure to disconnect the chassis battery before doing this
Got it done! I did have to take the whole thing out cuz I had to tap the bearing out from the pump side. Mine looked worse than yours because it’s 22 yrs old. The seal was still good though so I did leave it as suggested. Filled with fluid today and, man, what a difference! Thanks for letting me know I could do it.
I also repaired mine and realized corrosion was caused by an open hole on top of motor plate that allows water caught on top of motor to empty onto bearings and seals and motor internals , motor was made to sit horizontal not vertical , so I plugged the hole with silicone ,
how to disconnect the hydulic jacks alarm ?
Why is the alarm sounding? Of the hydraulic fluid level is low, the system thinks the jacks are still extended, this will sound the alarm if the transmission is placed in D or the parking brake is released.
With the jacks fully retracted, top off the hydraulic fluid.
To shut the alarm up, you need to disconnect the control board.
Hello I followed this when replacing the motor last week. On the motor front plate hydraulic side there is a small Allen bolt which I removed. When I put it back it the top broke off. What is this bolt for?
I can’t get my jacks to lower now so I’m worried that I’ve affected the pump operation .
I don’t remember there being a allen bolt, other than the ones that hold the pump together. Does the motor run?
Can you send me a photo?
waiter@iflyez.com
I have emailed you a picture.
Great article!
Had the same growling motor,
removed the motor pump tank assembly as one, separated the motor, used a small die grinder to split the outer bearing from the pump. Installed new bearing and assembled everything. What a treat to not hear all that noise, everything lights up and function’s when I hit the button’s but the Jack’s don’t move. Oh and we’re going on vacation in 4 day’s. Any help would be appreciated!
Did you touch anything else
On the system? I did when I down this and messed with something in the rear. It’s taken my a year to only just get the jacks down but they only make contact with the ground and don’t build enough pressure to lift.
I walked away from it that night a little bucky,
but fixed it the next night. Seems like every two years something starts to malfunction in either the leveling jacks, slide out or the electric steps, after cleaning and applying die electric grease on all the connections it works great!
None of them connections were unplugged during the bearing swap, that’s what made it a bit nerve wracking but obviously I moved the wires around enough to cause the extra problem.
Like Waiter says, if you have a poor connection either ground or positive, that solenoid will operate poorly and most of the wiring for the slide out, steps & leveling jacks are exposed to the road grime.
Thanks & good Luck Tom
God Bless