
Last winter while snowbirding in AZ and NV, we spent several days at sites with no hookups. During that time I was able to make measurements and test how the coaches 12 volt system performed. I made a couple modifications while we were in the sticks and seen an improvement, i.e. replaced the converter and ran a temporary jumper cable directly to the battery. I drew a diagram that shows power distribution from the converter to the batteries and wrote a short article that identified the issues and what I needed to do to mitigate them. READ HERE
I just finished doing a couple more of those upgrades I identified last winter: We’ll check these out this winter as I plan to once again spend some time in the desert.
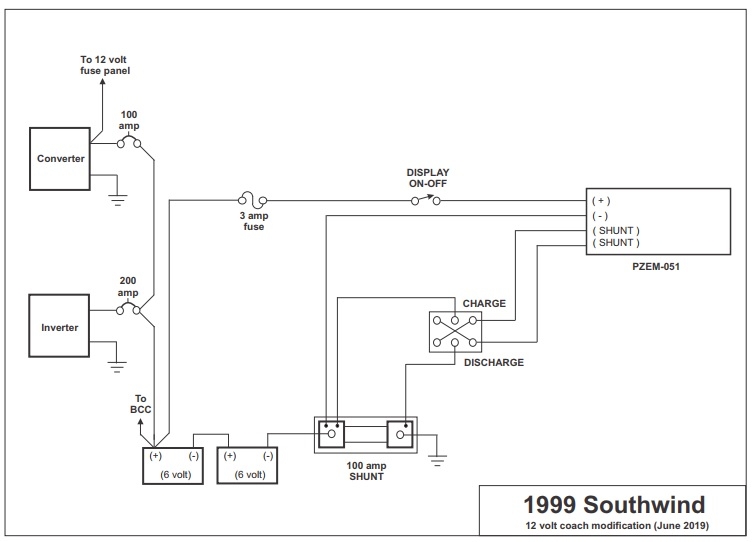 CLICK HERE to download a full size PDF diagram:
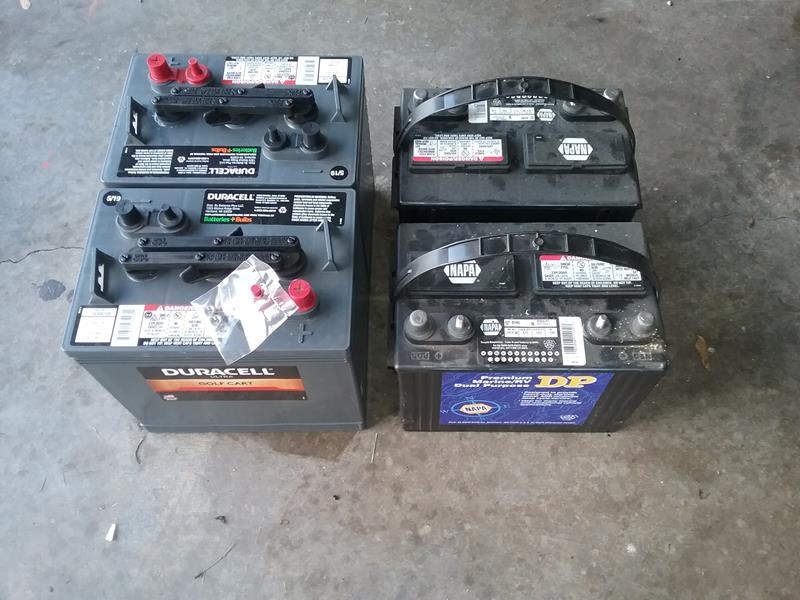
1) I replaced the original group 24 batteries with 2 GC-2 (235 amp) batteries. Based on battery weight, the GC-2’s give me about a 33% increase in battery capacity, AND the use of GC-2s verses marine batteries improves the deep cycling attributes of the batteries.
2) I installed a separate #6 wire and 100 amp breaker-disconnect to supply power directly to the batteries from the converter without going through the BCC. This direct path eliminates the 0.75 volt lose through the BCC when recharging the batteries.
OPERATION – Normally, I’d leave this breaker open. This allows the coach 12 volt system to operate normally; battery disconnects work, coach power passes through the BCC. Coach batteries charge from the engine or converter via the BCC as they normally do.
When I’m boondocking and need to minimize charging time from the generator, I close the breaker. This ties the converter directly to the batteries, bypassing the BCC, thus eliminating the 3/4 volt lose I normally get when charging through the BCC.
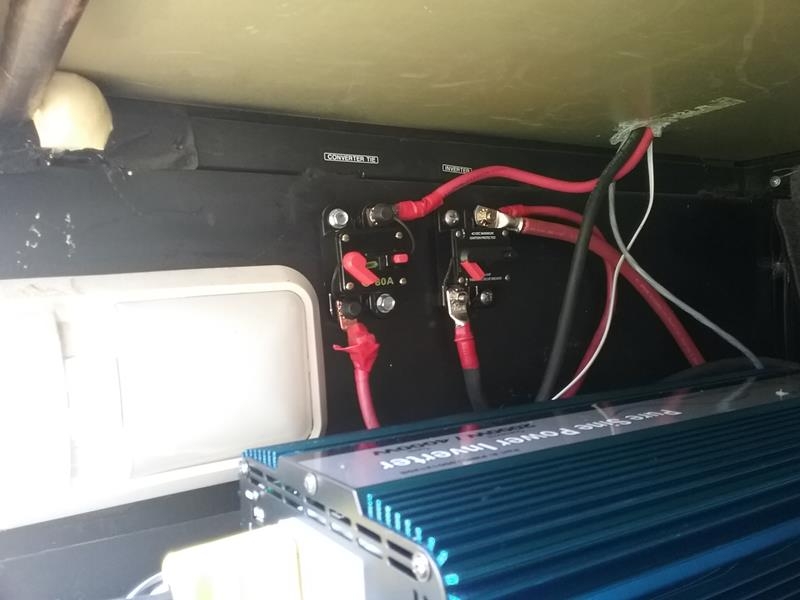
3) I upgraded my 1200 watt inverter to a 2000 watt PSW, I also ran new #2 power cables for the inverter. 12 volts to the inverter goes through a 200 amp breaker-disconnect. I have a remote control for the inverter located above my frig. There is also a 120 volt selection panel . I can select what loads / circuits I want to power from the inverter or normal AC power.. When we’re on shore power, I turn the inverter off and also open the 12 volt disconnect to remove power to it.
4) I installed a PZEM-051 digital volt/amp meter and 100 amp shunt. The shunt is installed between the battery negative side and ground.
PZEM-51 wiring.
The display gets its power directly from the coach battery through a 3 amp fuse and a switch to shut the display off. The MINUS power for the display attaches to the battery minus, or the shunt connection that’s connected to the battery minus.
SHUNT lead wiring – The ammeter cannot read negative amps. i.e. plus amps when charging and minus amps when discharging. It can only read positive amps. SO, to make it read CHARGE or DISCHARGE, the shunt leads are reversed on the meter. I do this with a Double Pole Double Pole (DPDT) switch. (NOTE – You could install two meters, one wired for CHARGE and the other wired for DISCHARGE.
IMPORTANT – Do not use one wire for both the PZEM-5’s MINUS lead and a SHUNT lead, you will get incorrect readings on the ammeter. . They MUST be separate wires.
The way the ammeter works, it measures the very tiny voltage that gets dropped across the shunt when current passes through it (0.75 volts per 100 amps). If you use one wire for both the meter minus and the shunt instead of two separate wires, that wire has current flowing through it to power the display. That current gets added to the shunt current, thus give a false reading..
Pingback: Need to upgrade Coach 12 volt power system – 1999 Southwind 35S
In the process of doing the battery monitor install now on my 99 south wind. How did you run the wires from the battery to the monitor? And did you have to remove the fridge for this install? Love the custom switch panel! Is that made out of sheet metal?
I did this while I was replacing the frig with a residential. The panel is made of aluminum. easy to drill.