
I winterized last February on our return trip from AZ. I drained the system, pumped antifreeze through all the plumbing, in the P-traps, tanks,I thought I did a good job of getting it ready for the sub zero winter… We didn’t use the Southwind during the summer, so it didn’t get de-winterized or sanitized.
In Mid December, we packed up and got everything ready to head south for the winter. I normally don’t de-winterize until we get into warmer climate. However, as we neared our departure date, the weather was forecast to be near 50 and stay above freezing, so I decided to de-winterize, sanitize, and fill the tank. I knew something was wrong almost immediately. Using the water pump, I got very little flow from the faucets and I could hear water running underneath the Southwind. After a few minutes I had water coming out the bottom in several locations. I obviously had a major leak. I’m glad I decided to add water now, before we hit the road, as this was going to be a major problem…
The Southwind has a sub-frame structure that sits on top of the F53s frame. This sub-frame structure is sealed and forms a large rectangular compartment about 10 inches tall, the width of the frame, and runs from behind the front wheels, extending almost all the way back to the rear bumper. The compartment is insulated and heated. The black and gray tanks are located in this heated compartment just aft of the rear wheels. The water service compartment at the rear drivers side is also heated, getting its heat from openings in the sub frame compartment.
Two exterior baggage compartments provide a limited access to the sub compartment area, these are just forward and just aft of the right front wheel. Looking inside at the very rear of these two compartments is a thick fabric flap. Open that flap and you can see inside the forward section of the heated sub-compartment.
THE LEAK
Most of the Southwind’s plumbing is inside the motor home above this heated compartment. However, two pipes run through this sub-frame compartment; cold water feed from the water compartment to the motor home plumbing, hot water feed from the plumbing to the water compartment (low point drain). These serve as the low point drains located in the water compartment.
The hot water pipe. Hot water runs from the shower faucet and goes straight down through the floor and into this heated compartment where it makes a 90 degree turn toward the rear. It then travels almost 10 ft on the bottom of this compartment, but before making several 90 degree turns to attach to the water panel, the pipe goes slightly uphill to cross over the top of the black water drain pipe. This slight uphill creates a low point that does not get drained completely. This is the place that collected water, froze, and split the pipe for about a 5 ft length.
FINDING THE LEAK
I could hear the leak and knew it was coming from inside the sub frame compartment, but had no idea where, what, how, why.. Unless you are real skinny and short, there’s no way to even get your head in this compartment to look. From the access flap above the propane tank, I shoved my work light into the compartment, then taped my smartphone to a long stick and would put it on RECORD. I’d push the stick inside the compartment at different locations and angles. After about 10 tries, I captured the leak.
NOTE – When you get to the leak at about the 10 second point. the video is rotated sideways. If you could turn the video 90 degrees clockwise, it would be correct. The bottom of the compartment is on the right, the side is on the top, and the top of the compartment is on the left. of the video. The large black tube looking thing is a structural support that connects the two side walls of the compartment.
HOW TO GET AT THE LEAK
The floor of the compartment uses two different style materials. Forward of the rear wheels its made up of a thin material that’s insulated. Behind the rear wheels the bottom is a steel plate. The black and gray tanks are mounted on this plate. When under the motor home, where these two plates meet can be clearly seen, almost directly above the rear axle. Also, from my video, I can see the difference from inside the compartment, so I had a very good idea exactly where the pipe was located.
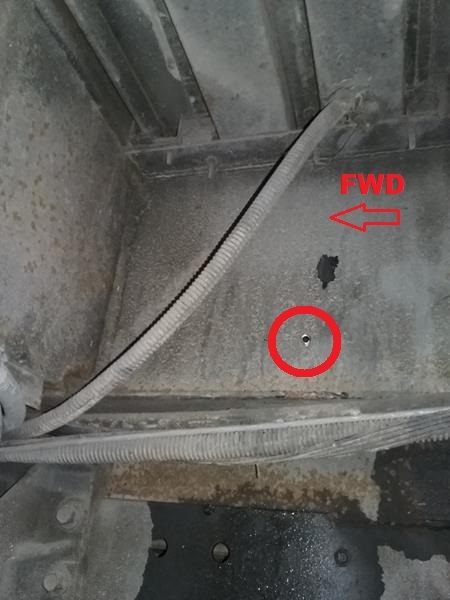 To verify the location, from the left rear wheel well, I drilled a small hole in the sub-frame wall and stuck a screwdriver in the hole. I could see the screwdriver inside the compartment, so now I knew exactly where the pipe was.
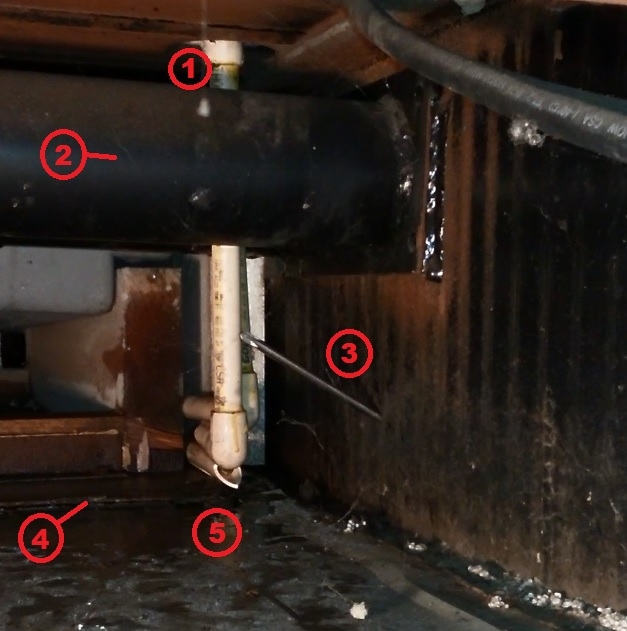 1) This is the floor of the motor home. The hot water pipe is coming through the floor directly below the shower compartment.
2) This is a structural support tube that holds the sides of the sub-frame together. You can’t see it in this photo, but just in front of this tube (almost directly above the camera) is the rectangular tube that supports the rear slide out mechanism. You can see the slide out rectangular rail in the video starting about 2 seconds.
3) This is the corrugated side frame. You can see the screwdriver blade sticking through a test hole that I drilled from the outside.
4) This is the seam of the bottom of the compartment. The rear floor piece is a steel sheet, the forward piece is a light weight insulated skin.. You can see the black tank (the gray area) sitting on a 2×4 structure.
5) Of course this is the broken pipe. You can see the broken portion of the elbow on the hot water pipe. This pipe extends almost 10 ft. to the rear of the motor home where it enters the water compartment. About 5 ft of this 10 ft. section was burst.
TOP, BOTTOM, or SIDE.
How can I get access to the broken pipe? Going through the top would mean cutting a hole in the floor so I could reach down to get to the pipe. This hole would be underneath the shower or on the other side of the shower in the living room.
Coming up through the bottom would be a better choice, but there is an F53 frame member and some shielding in the area that I would need to remove or cut around. This left the only option of going in through the side.
The place I need to cut is in the left rear wheel well, centered around the test hole, I cut out a small section of the side wall enough I could get my hands into, about 5 x 10 inches. I used a dye grinder to make the initial cut through the side wall, then used a saw-zall to cut out the rectangular shaped hole. The water pipes are about three inches away from the wall, so use a short blade. My initial guess was a little to high and I initially was cutting into the cross support tube, not a big deal, move the saw down and try again. I wanted to keep the hole as small as possible, but big enough to get my hand and a die grinder in the hole. There isn’t a lot of room to work.
After cutting the access hole, I felt the pipe to make sure it wasn’t broke above the 90 degree elbow. I then used my die grinder, reached in the hole and cut the old pipe a couple inches above the 90 degree elbow.
I then went to the water compartment and cut the pipe just before it made the 90 degree turn into the water compartment. I was then able to pull the entire bad piece of pipe out from the wheel well access hole.
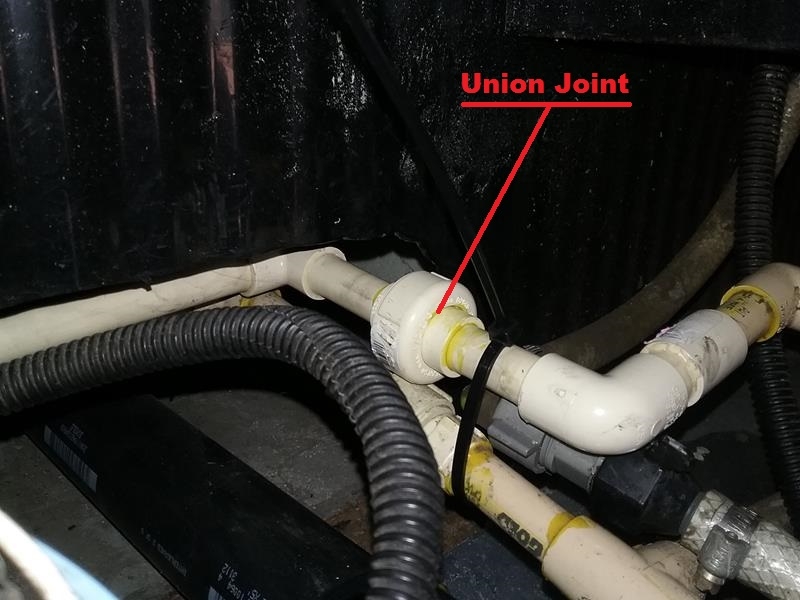
Back to the water compartment, I cut the remaining small section of pipe that had the two 90 degree turns. In 20-20 hind site, I could have disconnected the pipe at the original union joint, and re-used the union joint. but at the time I didn’t know what I was looking at until after I cut it out.
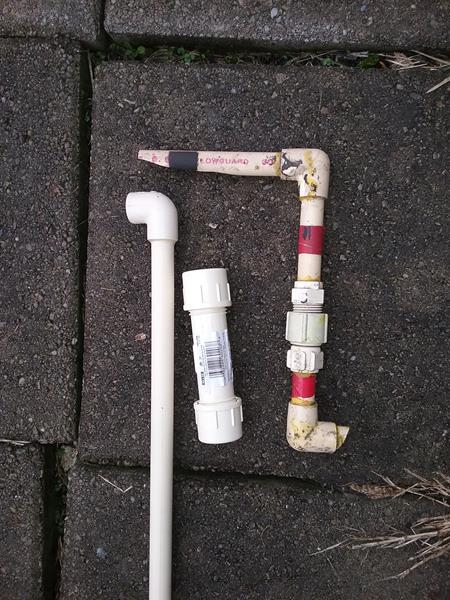 On the right side of the photo is the union joint I cut out. I could have disconnected the old pipe section and re-used it.
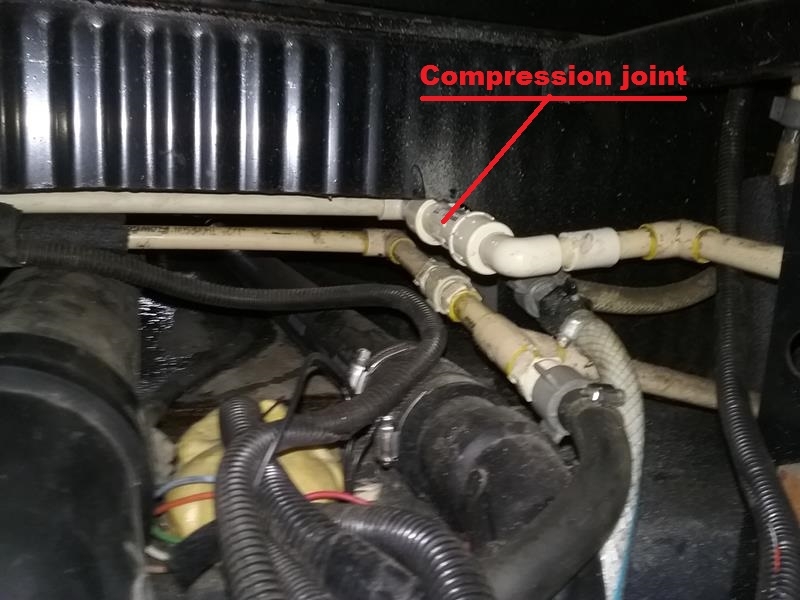
NOTE – When I installed the new pipe, I used a compression fitting. WRONG, It worked until we turned on the hot water, then it blew the joint apart. I removed the compression fitting and replaced it with a new Union joint (I could have just glued the pipes together.
NEW PIPE
I fished the new 10 ft section of pipe into the compartment from above the propane tank. I then went to my access hole and was able to slowly push the pipe through the sub compartment until I could see it from the water compartment.
I glued the fittings on in the water compartment and lined up so I could connect it by using the compression fitting (SEE NOTE ABOVE)
I then went to my access hole and marked and cut the 10 ft piece, I then cut a short section of pipe that goes up, After once again checking the final alignment of the pipe in the water compartment, I then glued the pieces together in the access hole..
 Viewed from the rear wheel access hole:
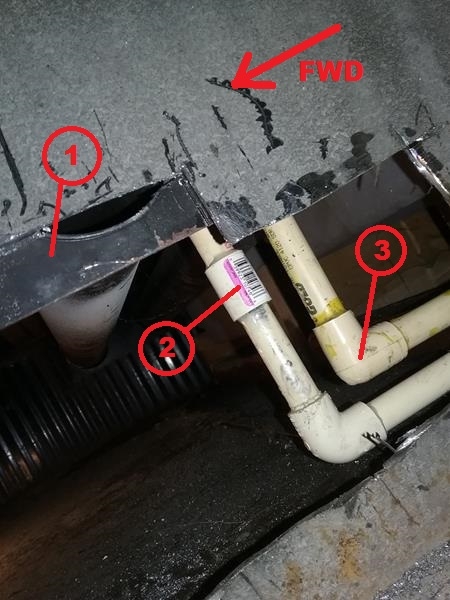
1) This is the cross member tube inside the sub-compartment. I accidentally cut into it when cutting the access hole opening. Not a big deal.
2) This is the new hot pipe connected to the original down pipe.
3) This is the original cold water pipe.
FIX the FIX
I originally used a compression type connector to connect the new pipes together in the water compartment. However, after turning on the hot water heater, and building up a little pressure, the connector blew off of the pipes. In the original repair, I was considering simply using a straight connector to glue the two pipes together. However, I chose to use some type of connector that I could take apart, in case I need to do any work behind the water panel. Since the compression type fitting failed, I replaced it with a Union type fitting. I should have done it this way in the first place.
COVER FOR ACCESS HOLE
I had a piece of sheet metal left over from another project, so cut a rectangular piece to fit over the access hole. I used silicon sealant then drilled pilot holes for the self drilling. #10 self drilling screws to secure the cover over the access hole.
 LESSONS LEARNED
From my broken gray tank dump pipe repair experience immediately after we bought the Southwind, I know that simply draining the water systems isn’t acceptable as there are sections of plumbing that do not get drained completely and must be either blown out or have antifreeze installed.
In my winterize checklist, I open the low point drains, then near the end of the process, I verify I have antifreeze flowing out the low point drains. I’ll need to double check this to make sure I really do this when I winterize.
Another amazing write up and coragrageous work!
It’s a pty you don’t habe a donate button! I’d without a doubt donate to this
brilliant blog! I suppose for now i’ll settle for book-marking and adding your RSS feed to my Google account.
I look forward to new updates and will talk about this website ith my Facebook group.
Talk soon!
Nice work. That would have cost you a bundle at the dealer / service center. Our local hourly RV shop rate is now over $115. Thanks for the inspiration on all the projects you do.
Thanks! We have the exact Southwind (I believe), and forgot to winterize last year before it got too cold. We’ve got busted pipes everywhere! We’ve replaced the two main ones in the belly like you did (your description was helpful – and apparently someone before us had already cut into the sidewalk of that corrugated beam!). We’ve also replaced the ones in the sink compartments that were visible. Unfortunately, we still have leaks… it seems mostly with pipes that run just above the floor (but below the slide-out main bed) or below the bathroom & refrigerator… I’m almost hopeless at this point. Any advice on how to replace or rerun these with pex without ripping everything up and out!?
What I thought was a minor issue has turned into a full blown ‘heart-attack’ of a problem!
Also have issues with my Onan putting out 180V…!
I’m wondering if I should give up!?
Thoughts???
DARN –
I’m not familiar with a bed slide-out (mine doesn’t have one).
I do have some plumbing that runs just under the carpet between the bathroom and the cabinets on the other side of the hallway. The bath gray water drain also runs in this trough under the carpet. I can see where its at when I pull out all the drawers.
There really isn’t any other way to do this then just start pulling stuff up. On the bright side, the PEX is more durable than the old original PVC and is a good upgrade.
As for the generator, check the slip ring and brushes. There’s an article on the site about servicing the generator that shows how to do it.
Turns out my generator problem was a bad battery in my voltmeter! Figured this out when my house was also measuring 180V!?! Replaced battery in meter – presto, 120V!
Waterlines on the other hand. I’m in the process of pulling things up to access them enough to run new lines…
I have a mechanic working on my 2000 Fleetwood Southwind water pipes to replace them all after I didn’t winterize. So far it looks to be costing me $3000. Does that seem reasonable?
Its a lot of work. 3k may be correct
Currently I am trying to assess where one of my leaks is. With a bore scope camera I was able to go in about 20 inches where the lines run to the toilet area. Problem is I don’t know what is under the floor From the bed to about the kitchen. Cannot tell if there’s a tank buried in there and trying to drill some test holes but I’m bumping into something and I’m hoping it’s not a Gray water tank or the Blackwater tank. Anybody that can tell me what lies below the floor it would be helpful. I believe that the reason for the heavy corrugated metal is to reinforce the actual frame of the 2000 South wind. By cutting into that panel structurally I think that is weakening the entire structure and the only weigh in effectively would be top-down or bottom-up which would mean removing the fuel tank. I wish there was a hidden diagram showing what’s under the floor from the bedroom to the kitchen area.
Any help would be appreciated. One break in the line again is about 20 inches toward the bathroom area.
Kerry
Thanks for any help
Call me
419-787-9585
John
AKA Waiter